One easy way to get started developing in RevBayes is to use an IDE (“Integrated Development Environment”) such as VSCode or QT Creator. IDEs are nice because they combine many features such as editing, debugging, compiling, and searching into a single graphical interface. This page will provide some helpful tips on how to set up these development enviroments.
Setting up the build environment
Before you can set up any of the IDEs you need to set up the build environment.
First you need to download the RevBayes source code and compile it using the command line.
There are slightly different instructions for Linux, Mac, and Windows.
You can compile the source code with either CMake (via build.sh) or Meson to perform the compilation.
Once you have successfully compiled and installed RevBayes, you can proceed to setting up an IDE.
Although IDEs are useful, they are not a requirement. Some developers do not use an IDE. Instead they use the command line to compile, and use a separate editor (e.g. emacs or vim) for editing, and gdb or lldb for debugging.
Setting up Visual Studio Code for RevBayes development
Visual Studio Code (or VSCode) is an open-source text editor by Microsoft. You can download and install it here.
Prerequisites
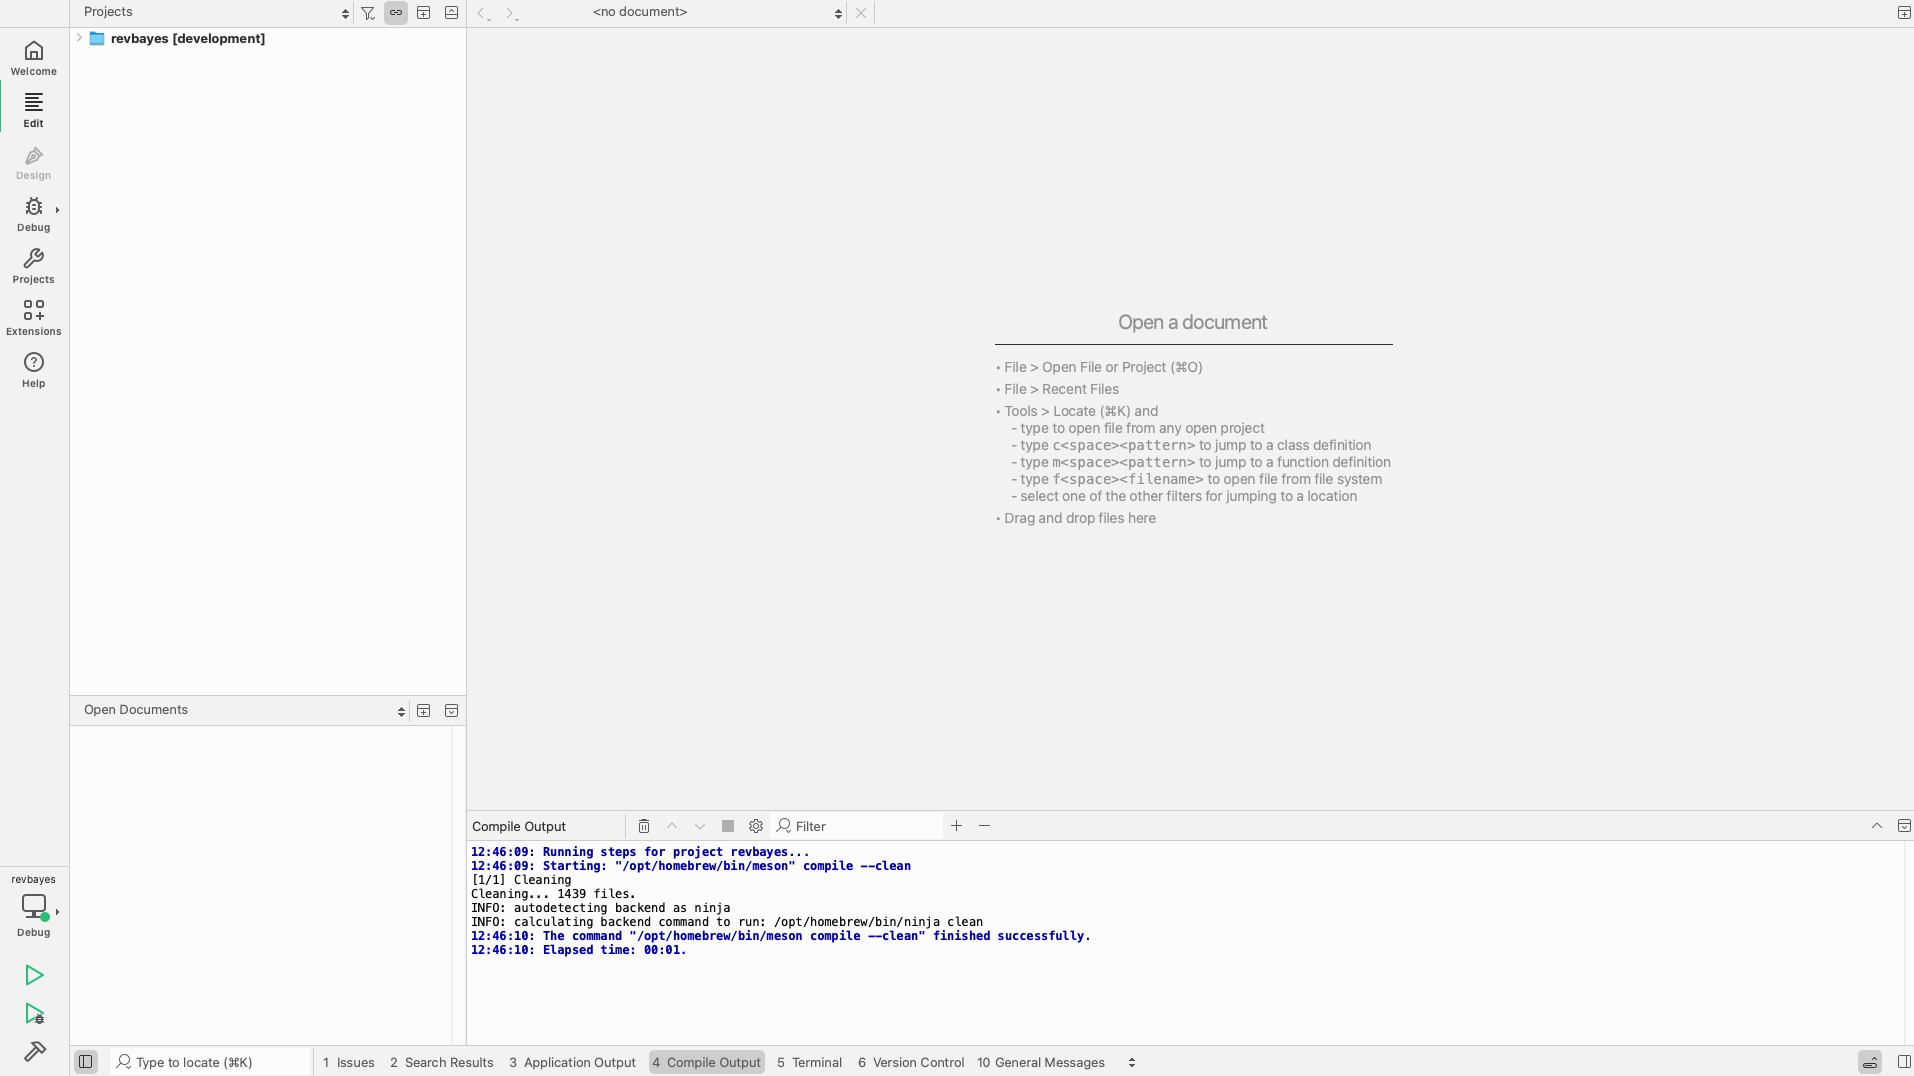
You will first need to set up the build environment by compiling RevBayes on the command line. Once you have compiled RevBayes, open VSCode. Once VSCode is open you will need to select the RevBayes folder from wherever you have stored it on your computer.
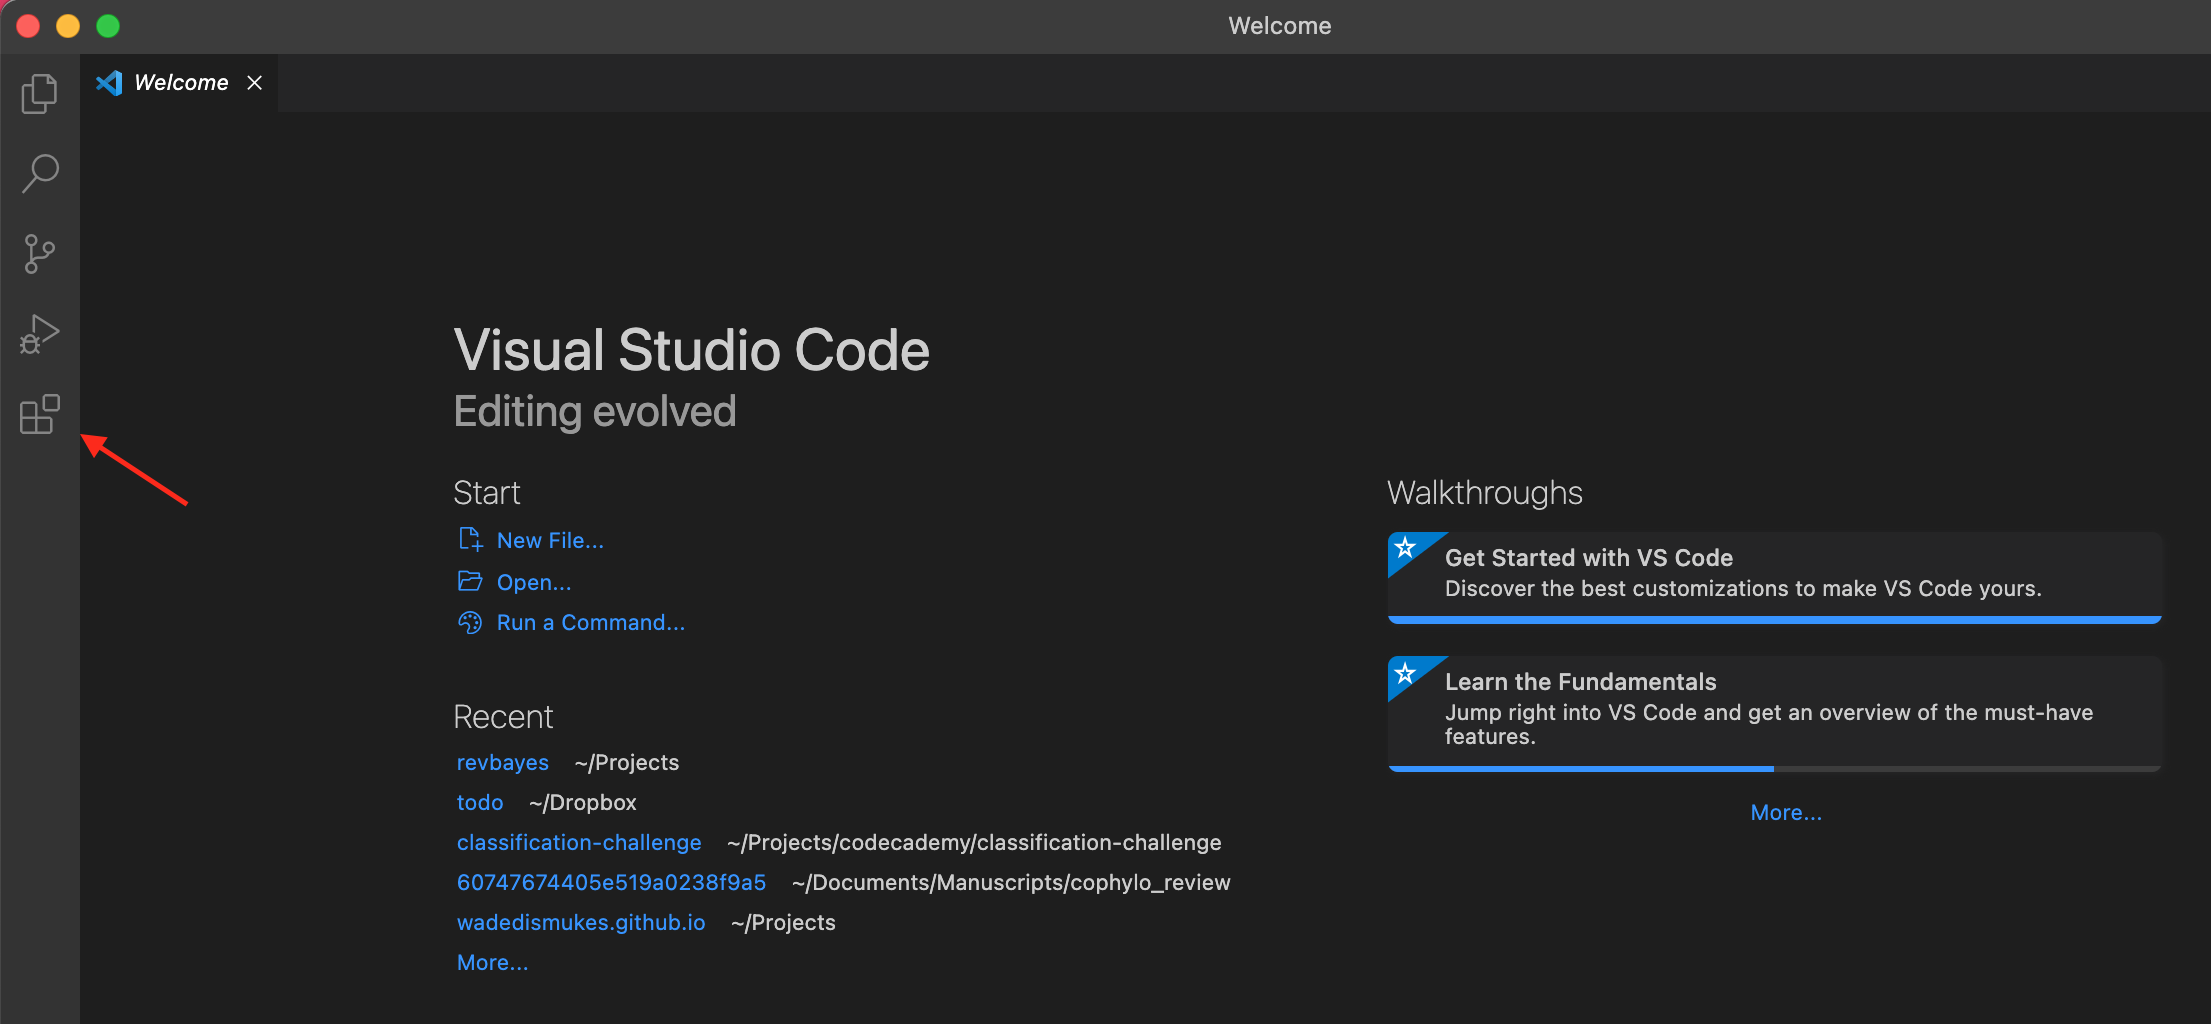
Now you will need to install three extensions to get RevBayes to work nicely. To do this click on the button shown below in VSCode.
Getting RevBayes working
Once here you need to search for the “C/C++ extension” , the “CMake extension” , and the “CMake tools extension” .
Now that these are installed, CMake tools will prompt in the lower right asking you to locate the file named CMakeLists.txt. If this prompt does not appear, configure CMake manually by typing Ctrl+Shift+P (or CMD+Shift+P) to bring up the command palette, typing “configure”, and running CMake: Configure or CMake: Delete cache and Reconfigure. This should prompt the choice to locate CMakeLists.txt. Choose the file located in revbayes/src/CMakeLists.txt. This will prompt a choice of compiler kit. You can choose clang or gcc, either will work. This should begin building RevBayes using CMake and a new folder should appear in revbayes called build. This will contain the compiled files and will eventually be added to .gitignore. If it is not currently in it, you will need to add this to the .gitignore file. Specifically, add build/** and vscode/** to .gitignore. If the build does not start automatically click the build button (the gear icon) on the blue bar on the bottom of the screen. Note that VScode will build RevBayes to a different location than running ./build.sh on the command line. The rb executable built by VSCode will be in revbayes/build.
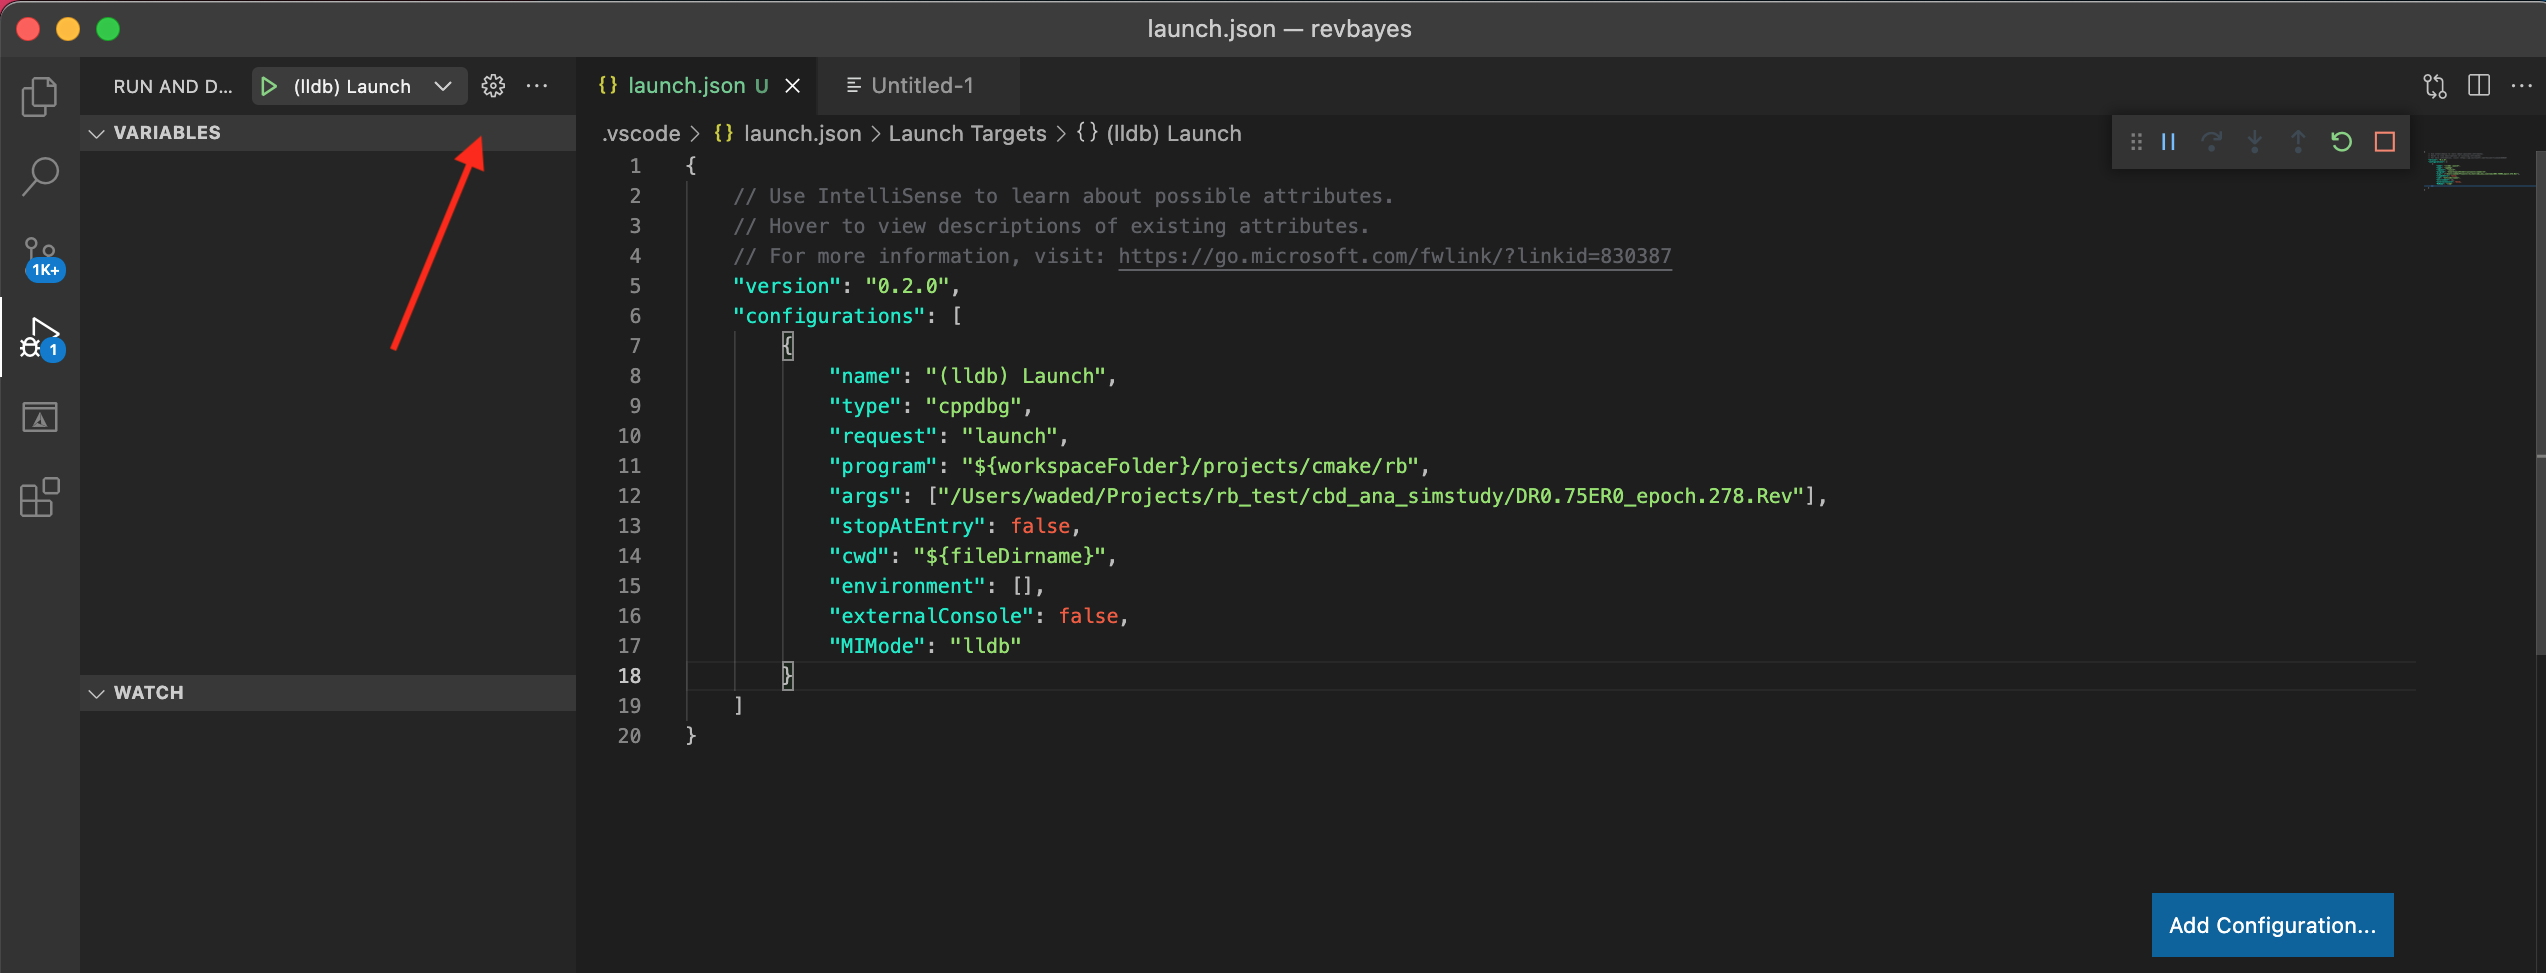
Once the CMake build finishes, you can setup debugging by clicking the triangle with the small beatle in the lower left. Now click on the gear shown below. This will open a new file called launch.json. You need to change the values for the "program:" object to the path where your rb executeable is. For example, "${workspaceFolder}/build/rb". In VSCode ${workspaceFolder} refers to the root folder of the project you opened (unless you have changed the folder’s name, this is most likely revbayes). To test a specific rev script, change the value of the "args" object to a location of a Rev script. With that you can use debugging in VSCode by pressing the play button on the debug panel, or using the command palette (Ctrl+Shift+P or CMD+Shift+P) and using the “CMake: Debug” command. VSCode will then run the file you added to "args", but stop the process whenever it reaches a line you have set with a breakpoint (i.e. where you have clicked to the left of the line number, adding a small red dot). When stopped at a breakpoint, you can use the debugging panels to investigate variables and functions to debug your program.
Setting up XCode for RevBayes development
XCode is an IDE for Mac OSX. XCode does not keep track of files, so each time you open your RevBayes project in Xcode you must pull the RevBayes master branch from git & remove reference to all of the source. Eclipse Oxygen does a cleaner job of managing the files; you do not need to pull from git each time you work in it.
Set up the XCode Project with an internal build system
- Open Xcode and in the Welcome to Xcode window, choose Create a new Xcode project.
- Select Command Line Tool and name it
rband click Next.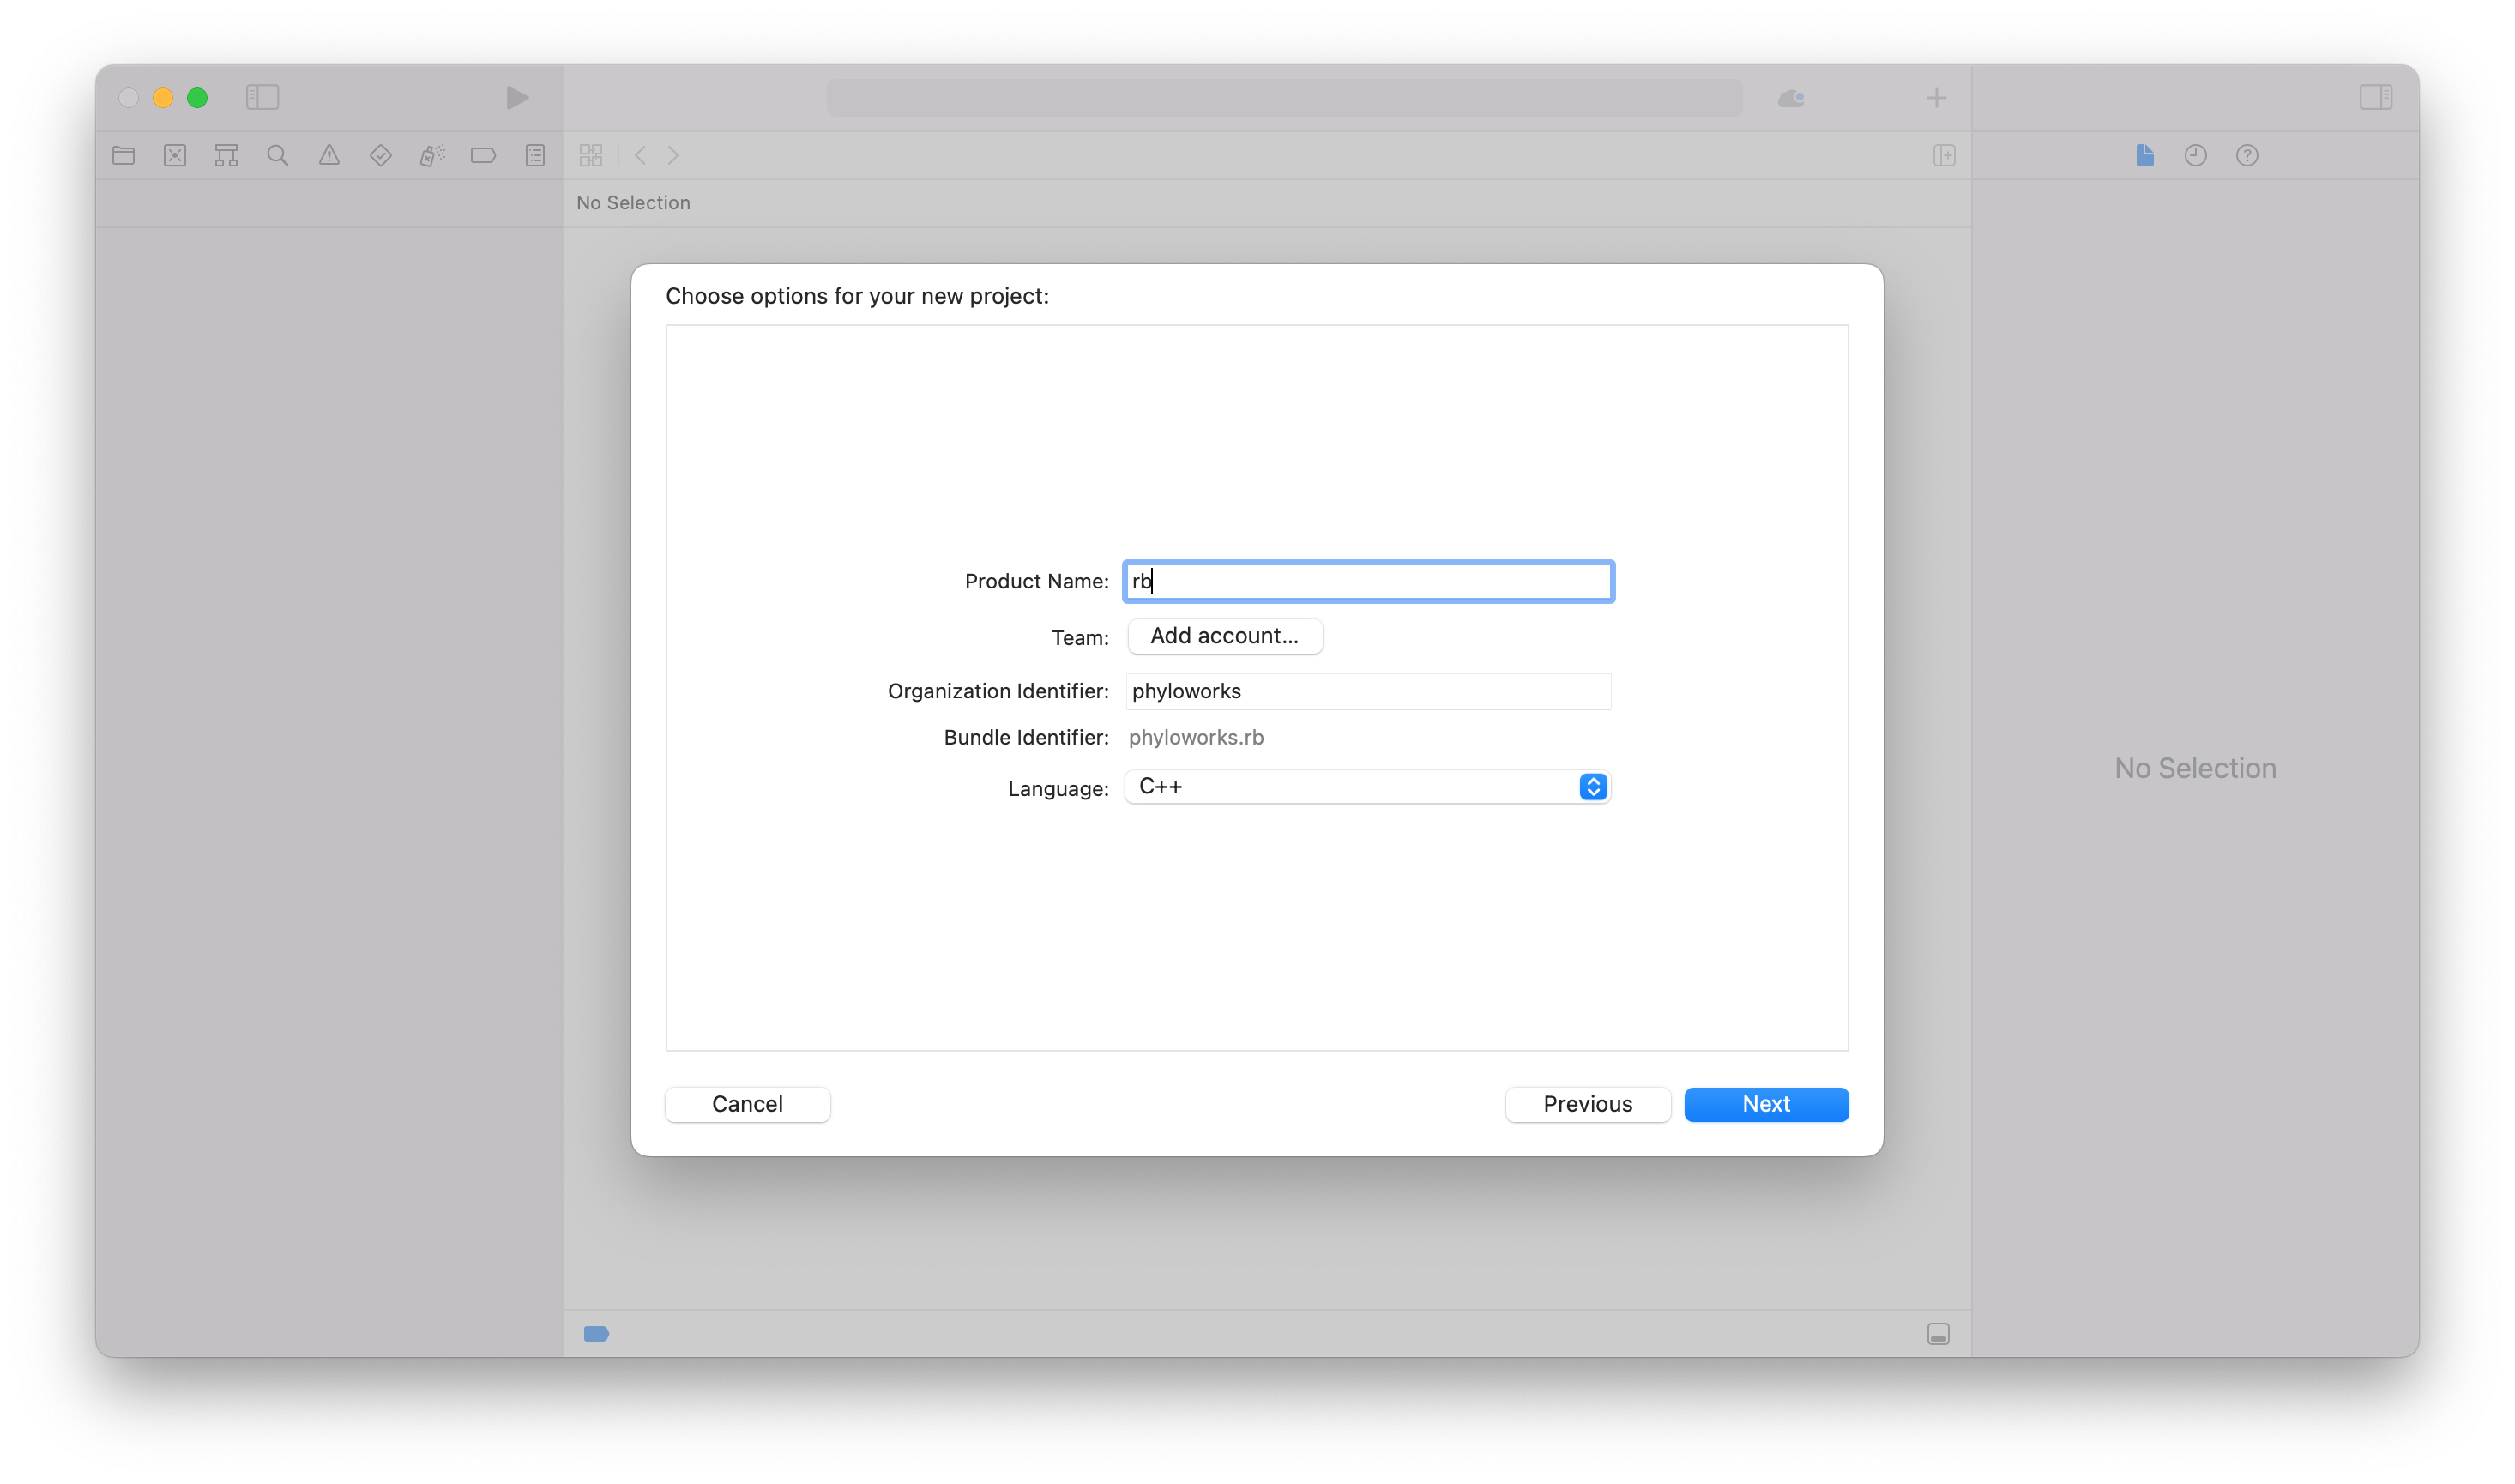
- Click New Folder to create an empty directory and name it whatever you’d like.
- Click Create.
- Delete all of the files and folders in each of the directories including
main.cppso that RevBayes is empty. You can do this by selecting the folders and files, right clicking and selecting delete. When asked, choose Move to Trash. - Add the source files by selecting the appropriate directory and going to the File pull-down menu and selecting Add Files to rb.
- Click on Options at the button of the window, and under the Added Folders heading, select the Create Groups radio button.
- Select the
revbayes/src/revlanguagerevbayes/src/corerevbayes/src/libs
- directories and click Add.
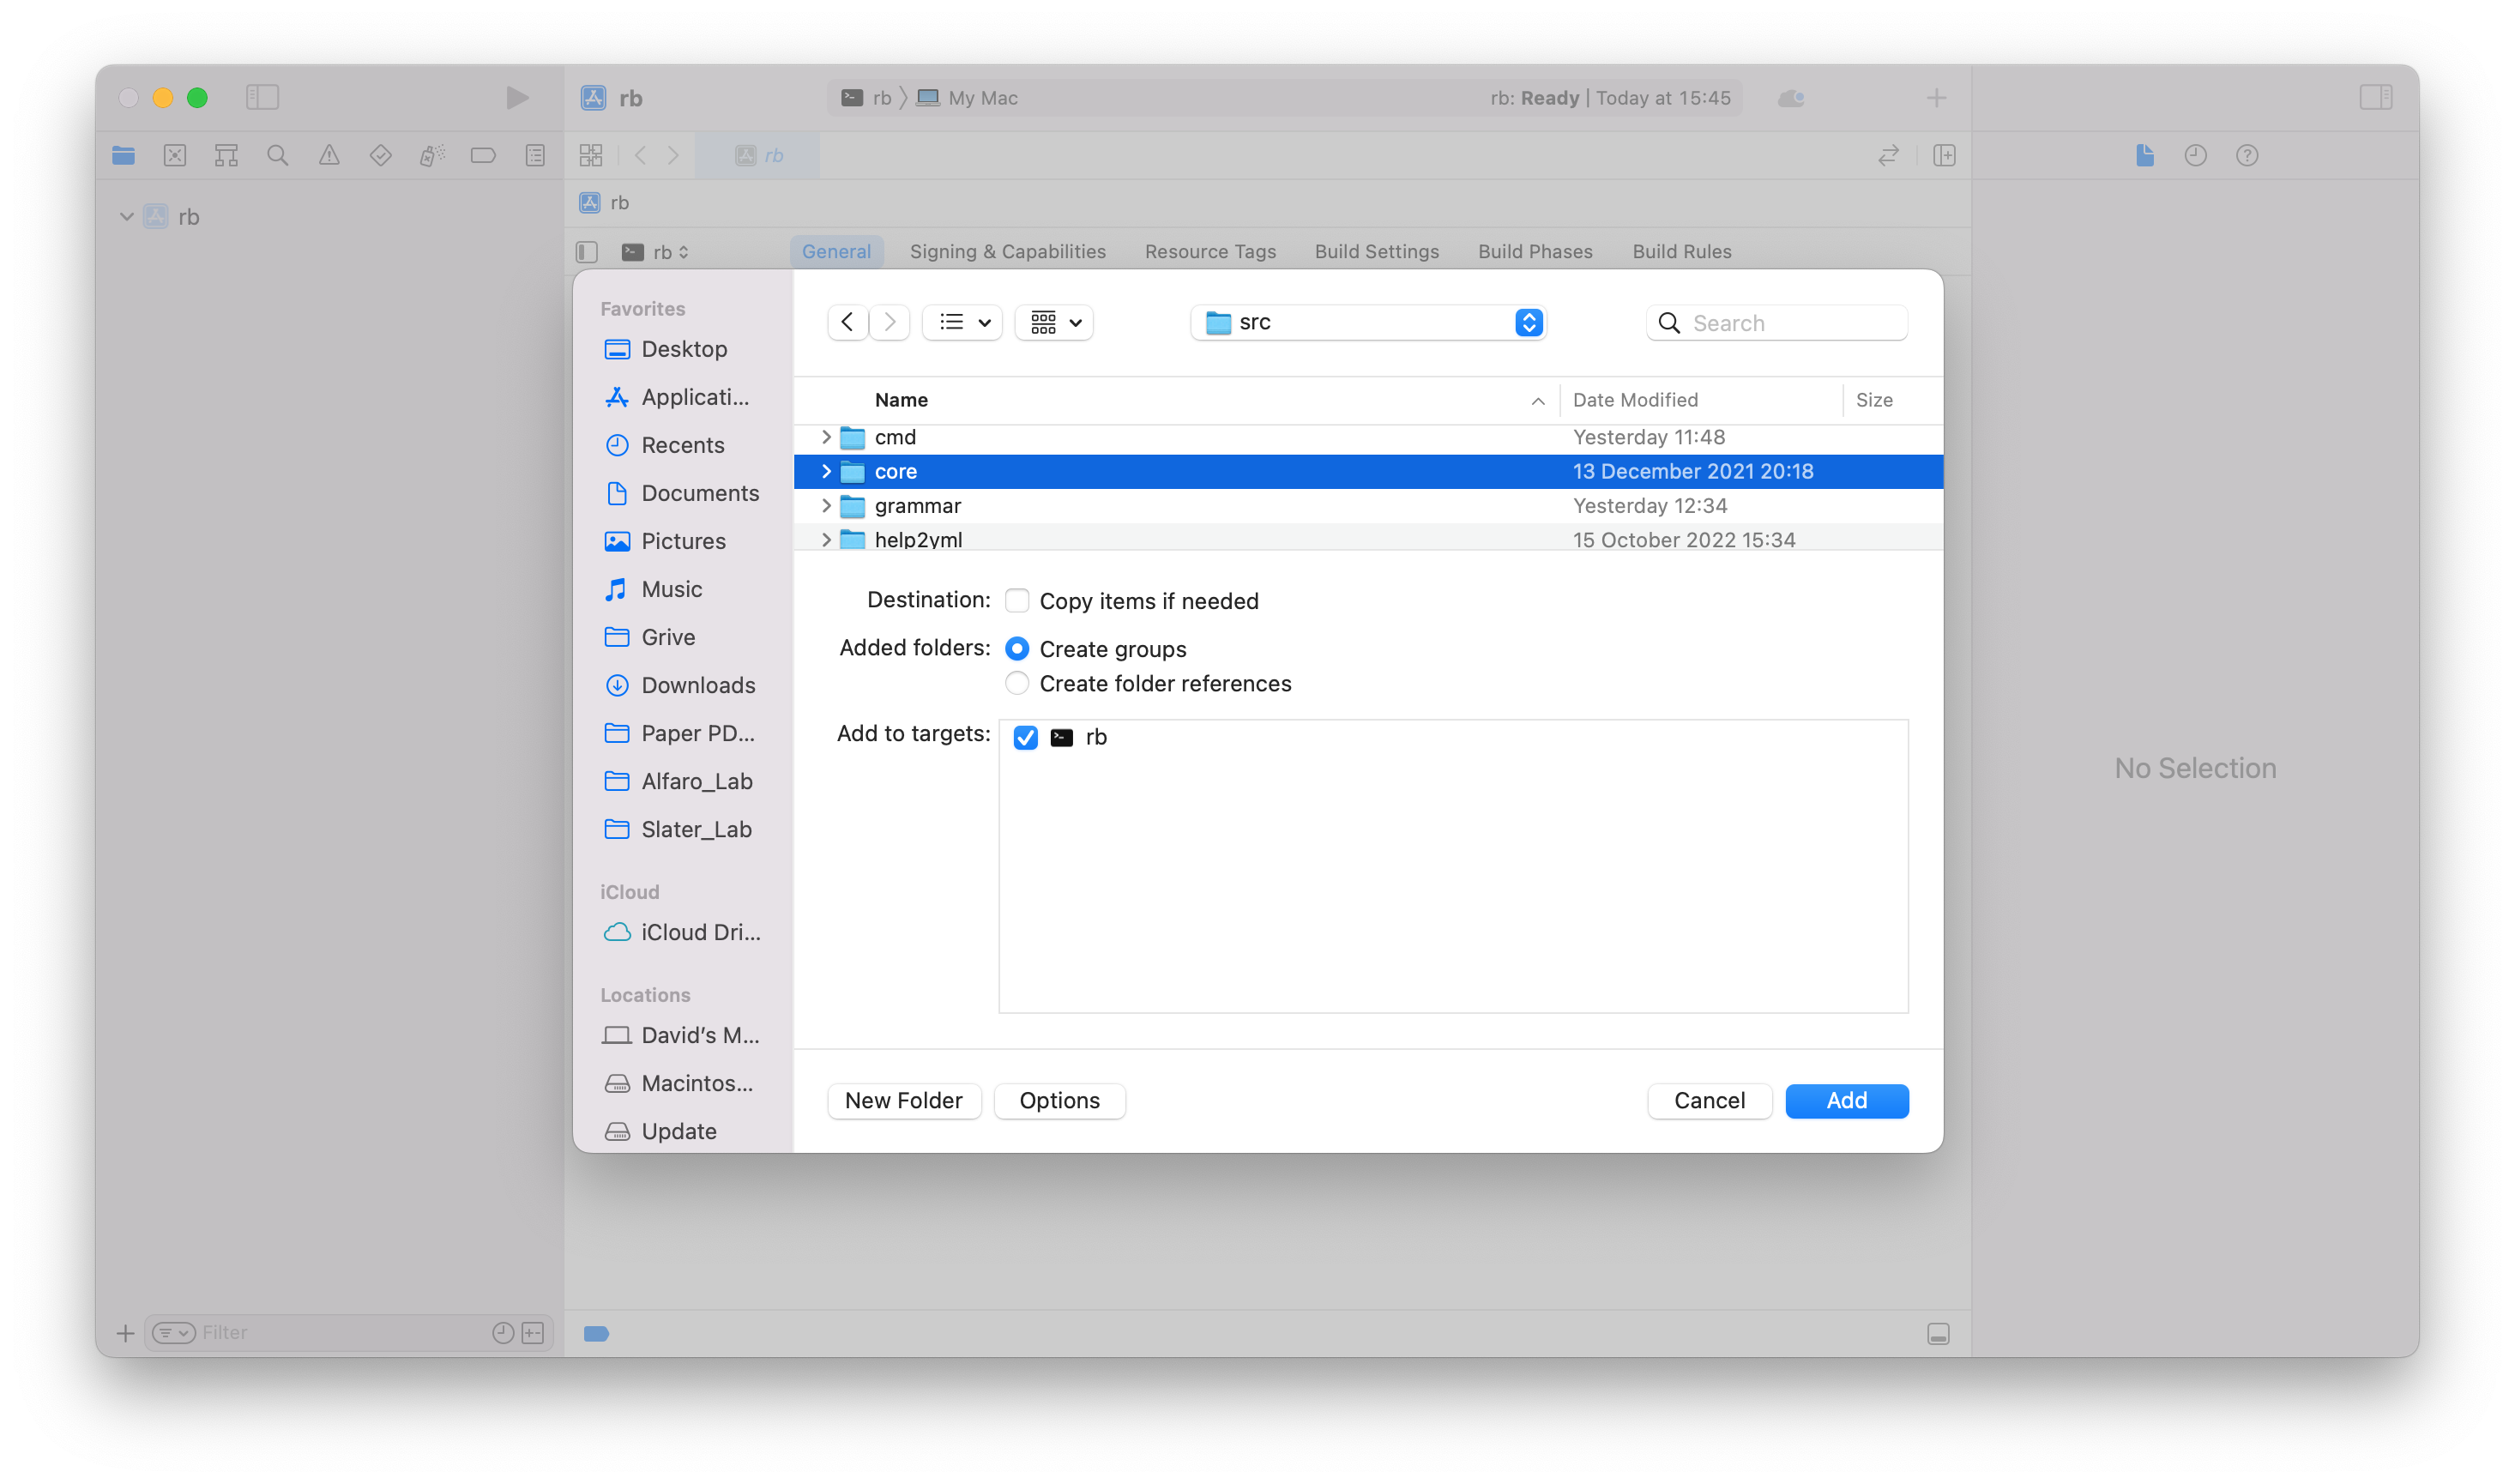
- Note: On some versions of XCode, you may need to click on the “Options” Tab, and choose “Create Groups” for the import to work properly. This is the default behavior on most XCode installs.
- Select the
- Add the boost library to your Xcode project:
- You have to install boost from another source and point your Xcode project to that version. If you use Homebrew as a package management system on your Mac, you can install boost using
brew install boost. This will install the boost libraries in your/usr/localdirectory. To enable this version in your Xcode project, scroll to the Search Paths section in the Build Settings and add the following paths:- Header Search Paths:
/usr/local/include - Library Search Paths:
/usr/local/lib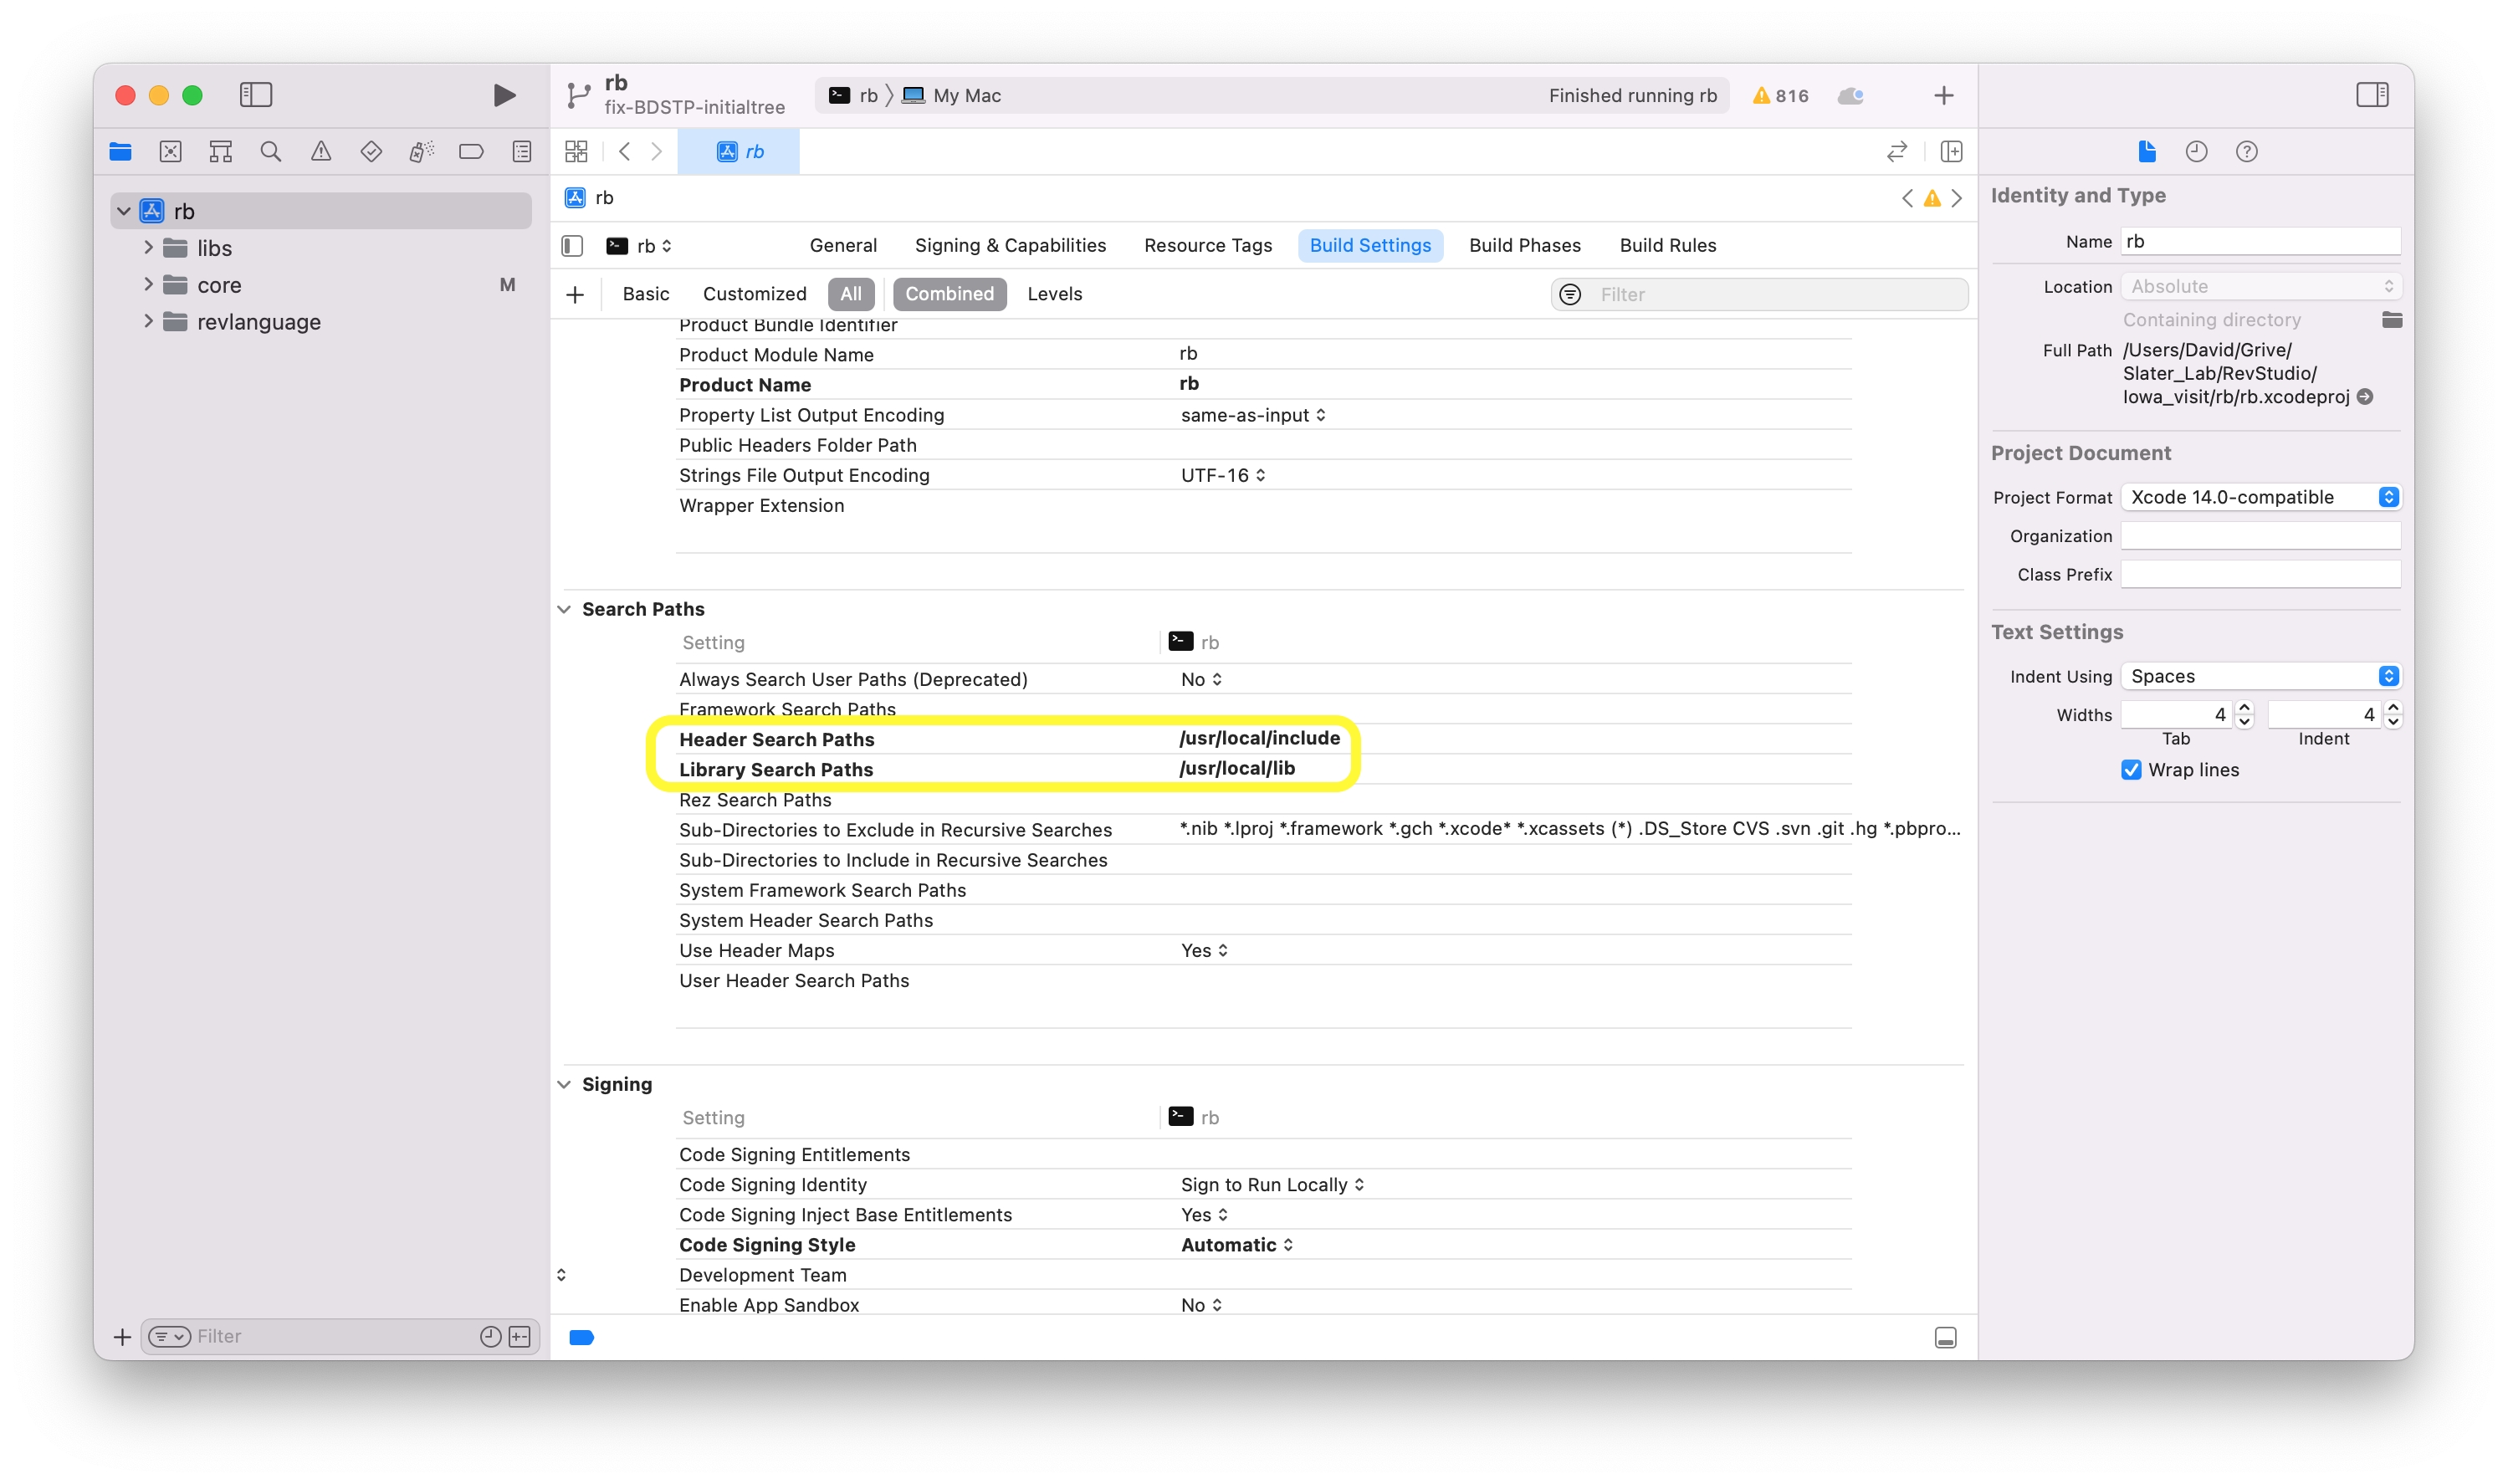
- Header Search Paths:
- You have to install boost from another source and point your Xcode project to that version. If you use Homebrew as a package management system on your Mac, you can install boost using
- Add boost linker flags
- Scroll to the Linking section in the Build Settings
- Go to Other Linker Flags and double click on the space. This will bring up a box where you can add the following flags:
-lboost_program_options,-lboost_filesystem,-lboost_system.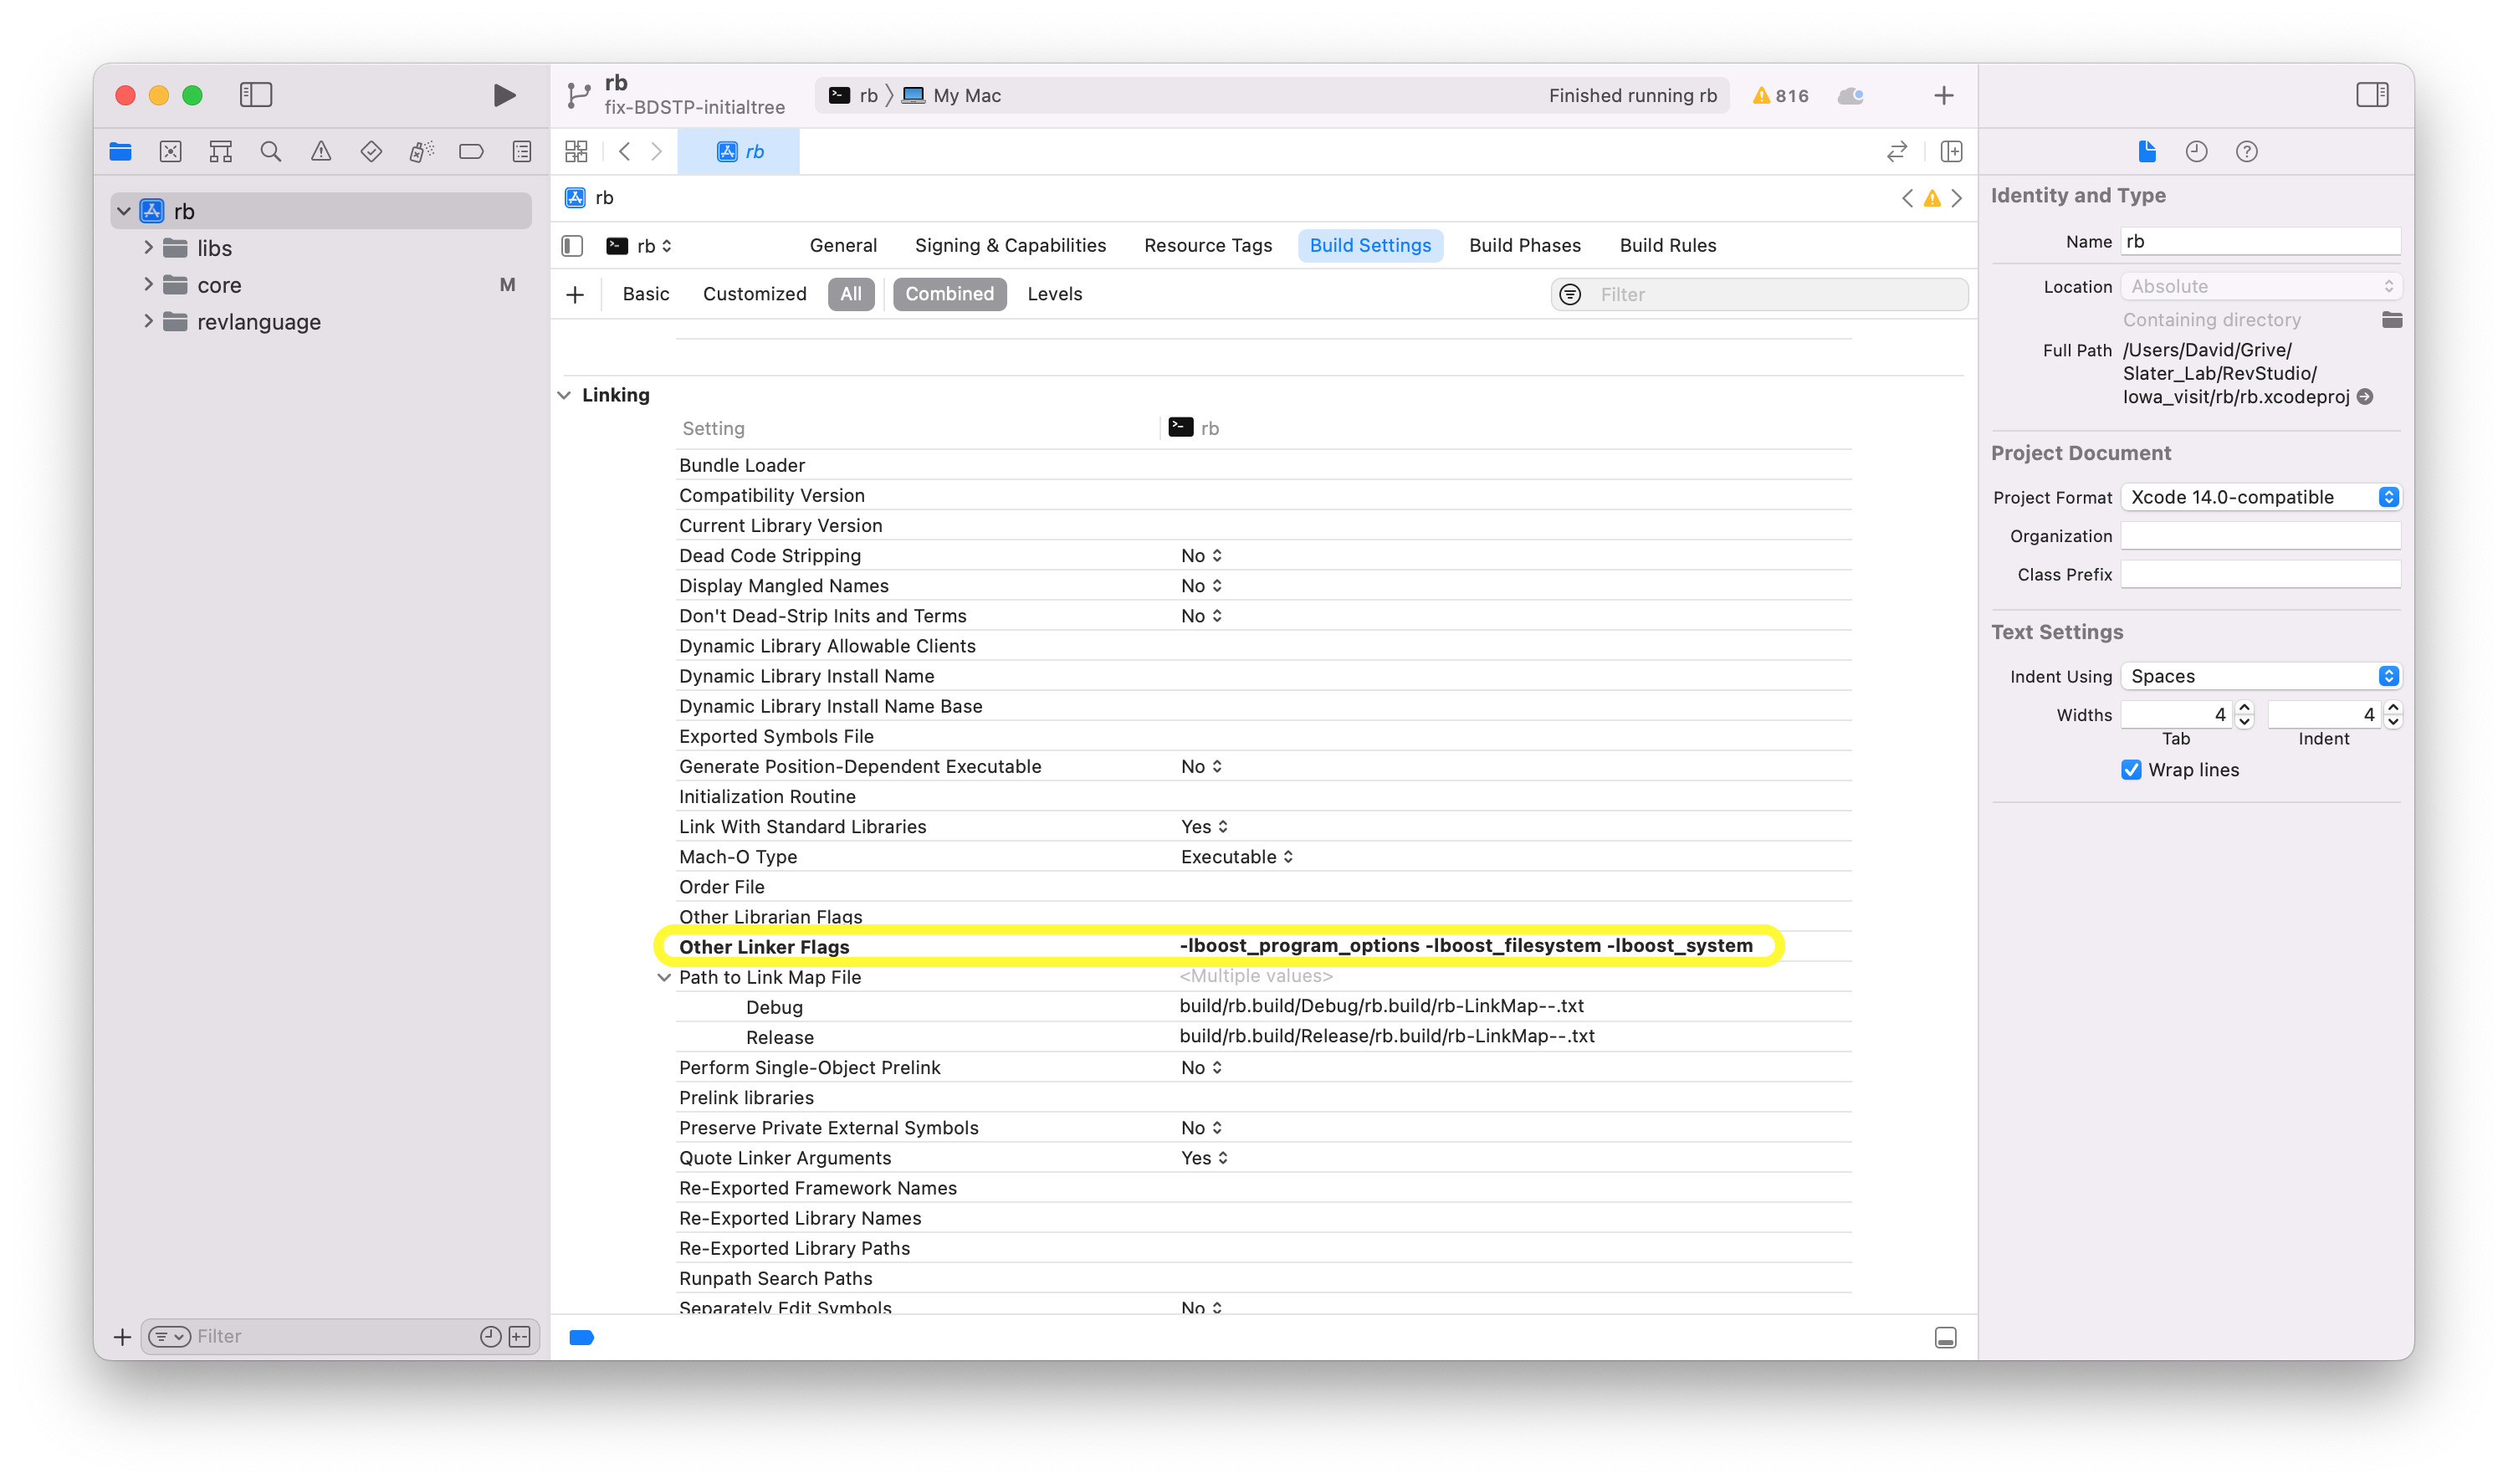
Add the RB_XCODE Preprocessor Macro to your Xcode project
- Select the RevBayes project and go to the Build Settings.
- Search for or Scroll down to the Apple Clang - Preprocessing heading and find the sub-heading named Preprocessor Macros.
- Double click on right hand column, click on the + and enter
RB_XCODE. Do not replace the debug flag that is already present.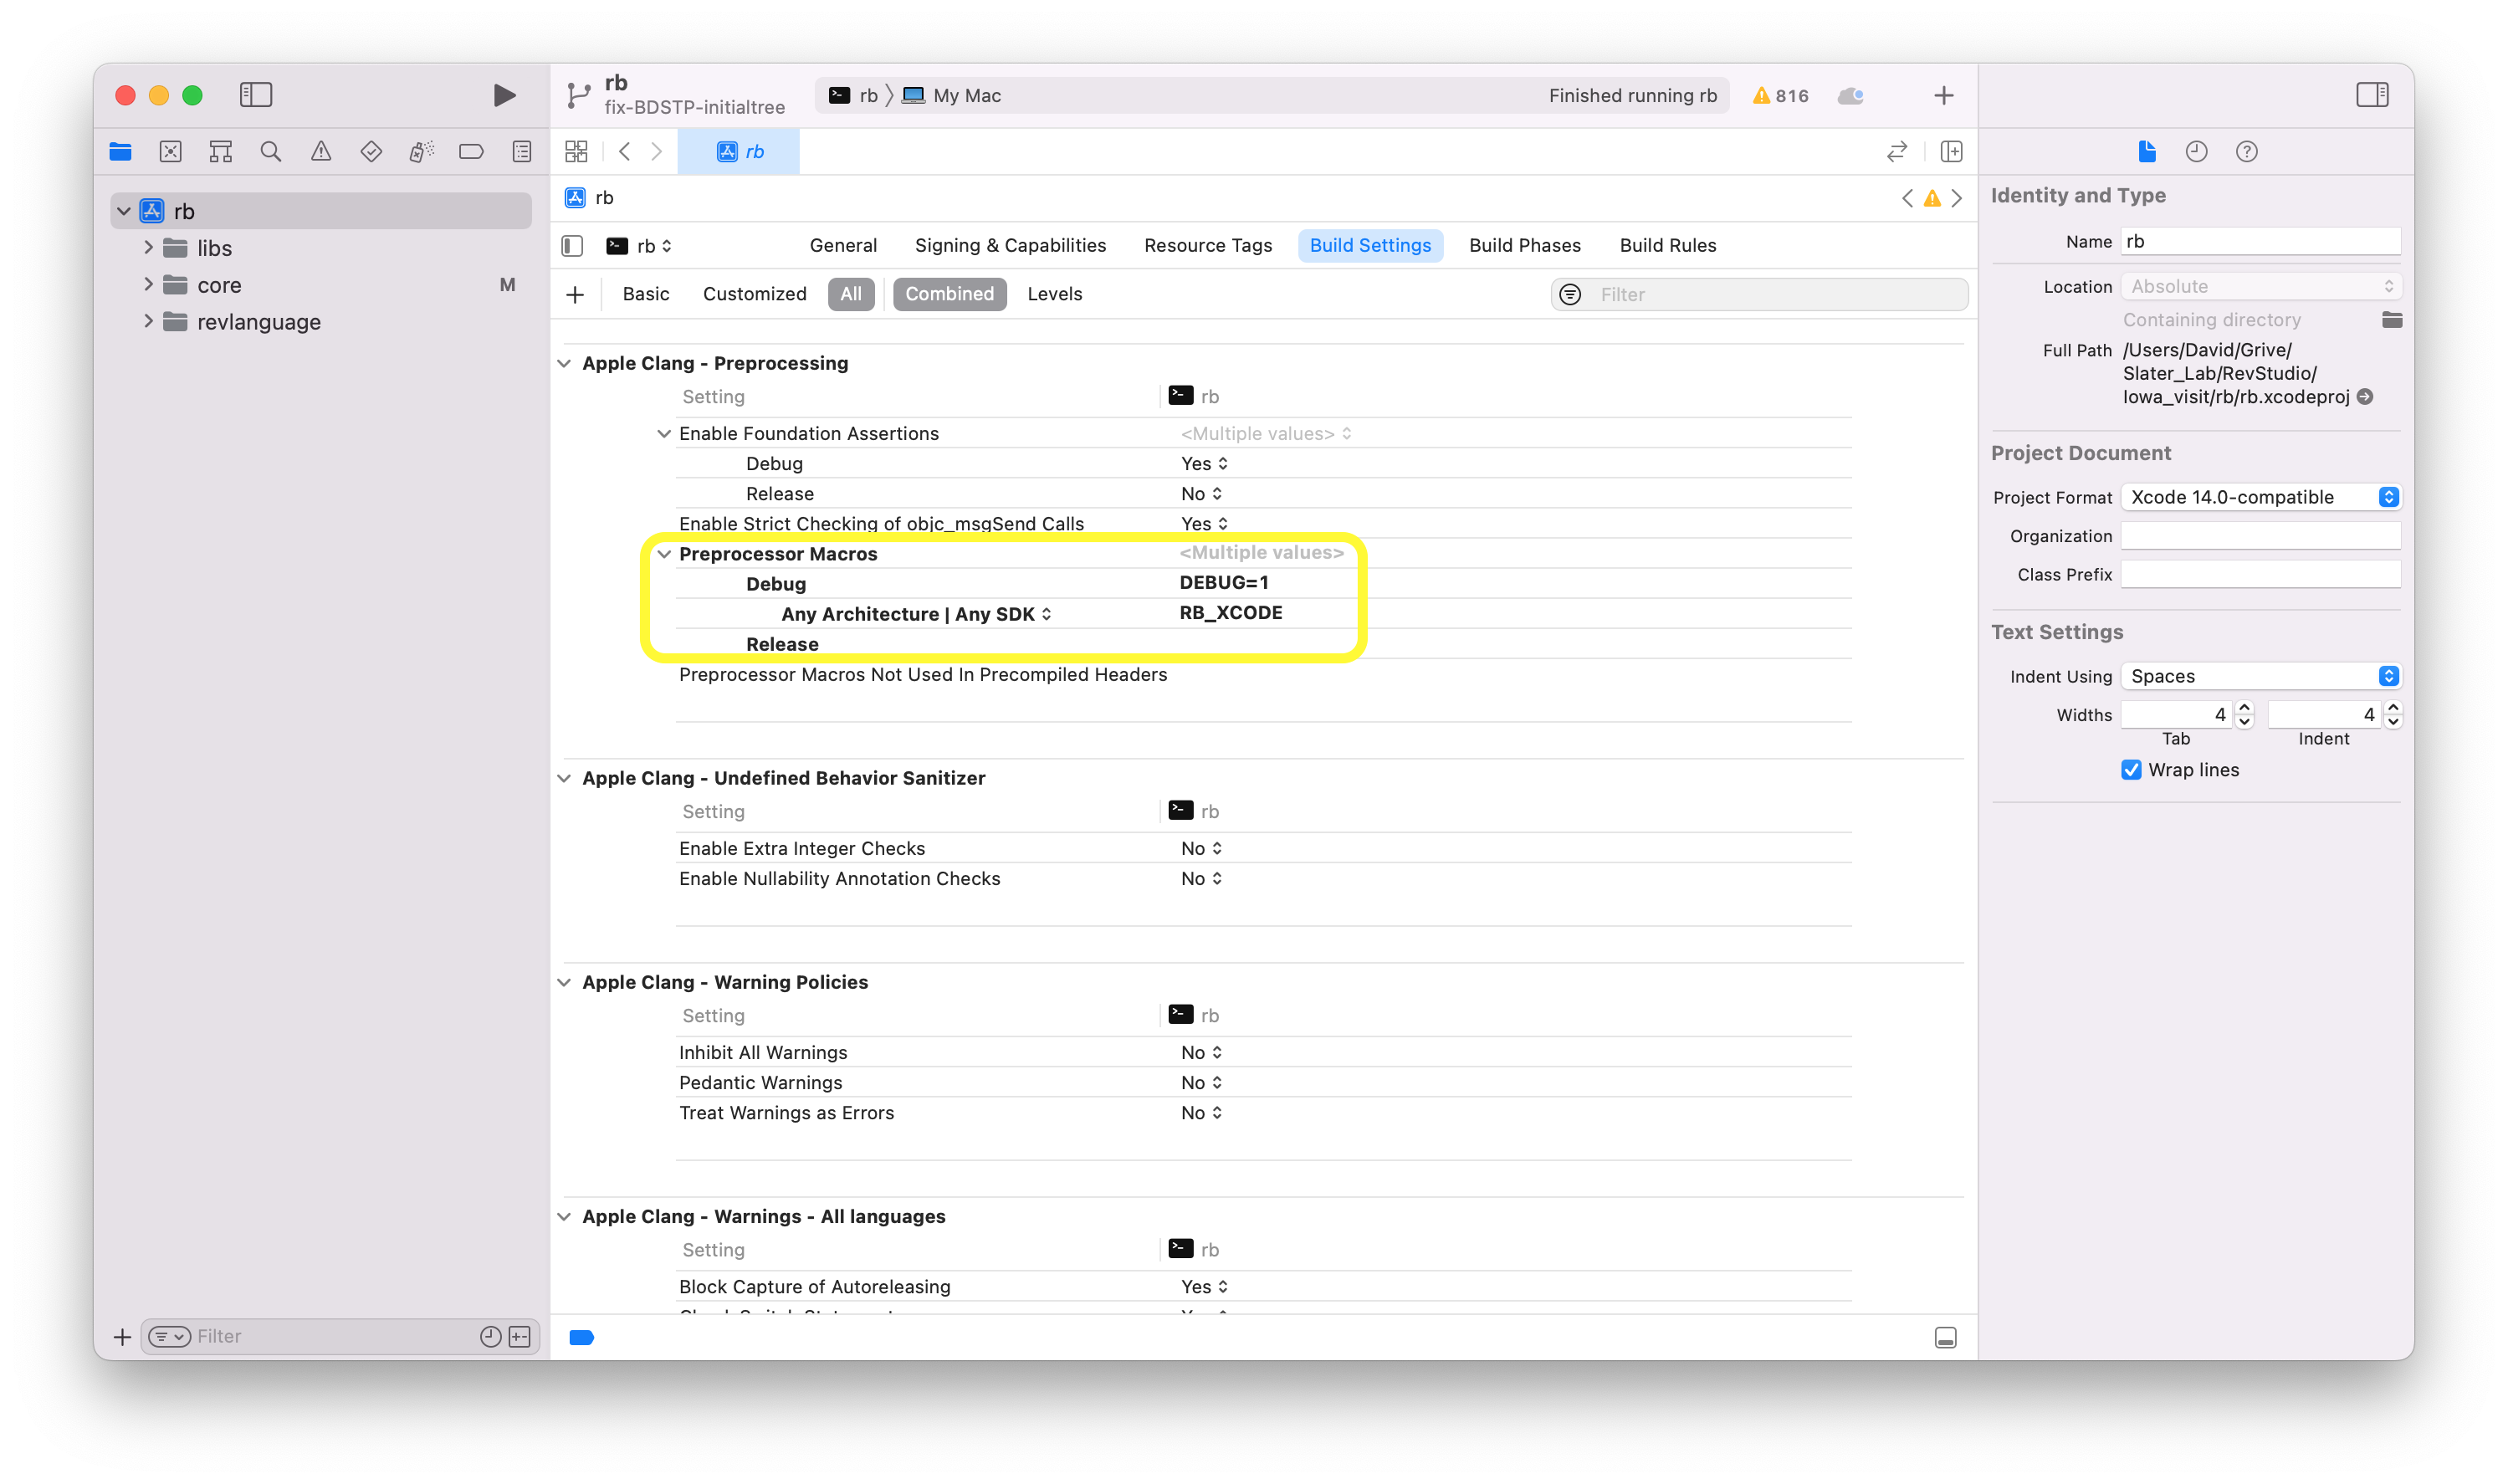
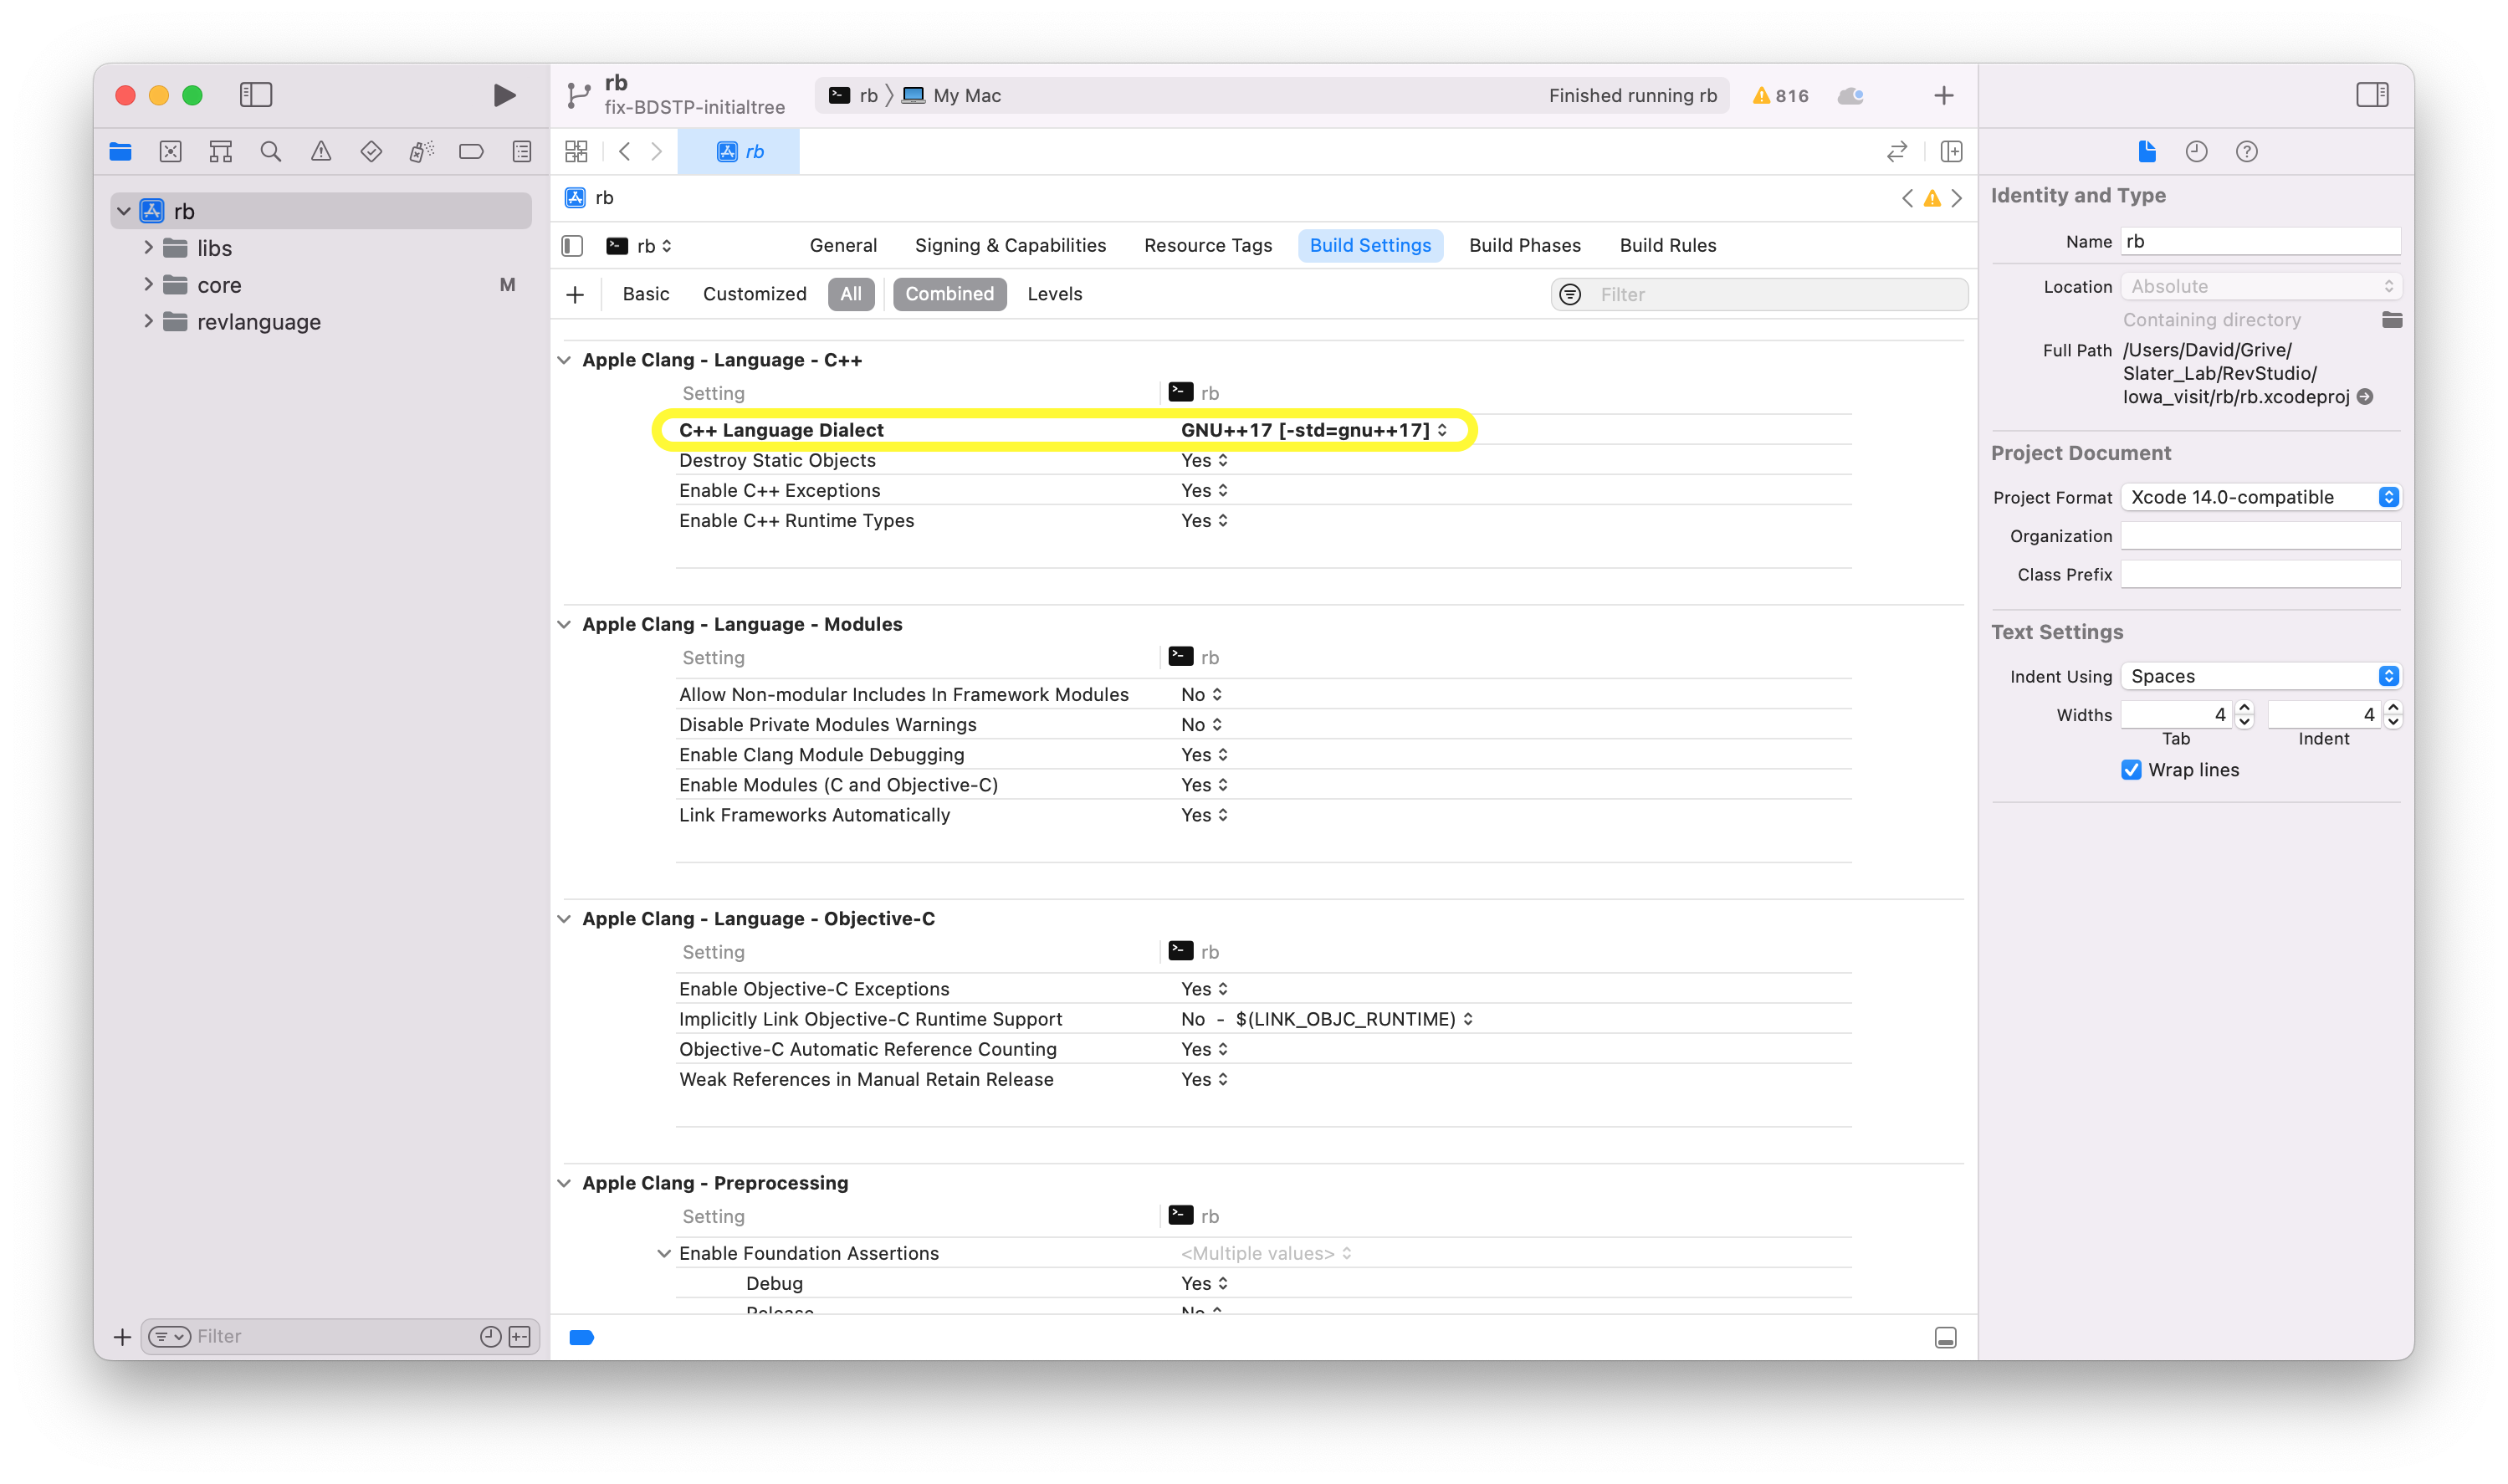
Check C++ language options
- Select the RevBayes project and go to the Build Settings.
- Search or scroll to: Apple Clang - Language - C++.
- Make sure C++ Language Dialect is set to GNU++23 [-std=gnu++23].
At this point, if everything has been setup correctly, you should be able to build the project. You can try by clicking on Product - Build or by using ⌘+B.
Set up the XCode Project with an external build system
Prerequisites
- To compile RevBayes using Xcode, first install https://cmake.org/ and its https://stackoverflow.com/questions/30668601/installing-cmake-command-line-tools-on-a-mac. This is easily done using https://brew.sh/ by running
brew install cmakein terminal.
Create an Xcode project for RevBayes
- Open Xcode and in the Welcome to Xcode window, choose Create a new Xcode project.
- Click on the Cross-Platform tab at the top
- Select External Build System and name it rb (or whatever you’d like)
- Under Build Tool type the following directory
/<path-to-revbayes>/revbayes/projects/cmake/build.sh - Click Next.
Configure the build
- After clicking Next as directed above, you should see a screen that looks like this:
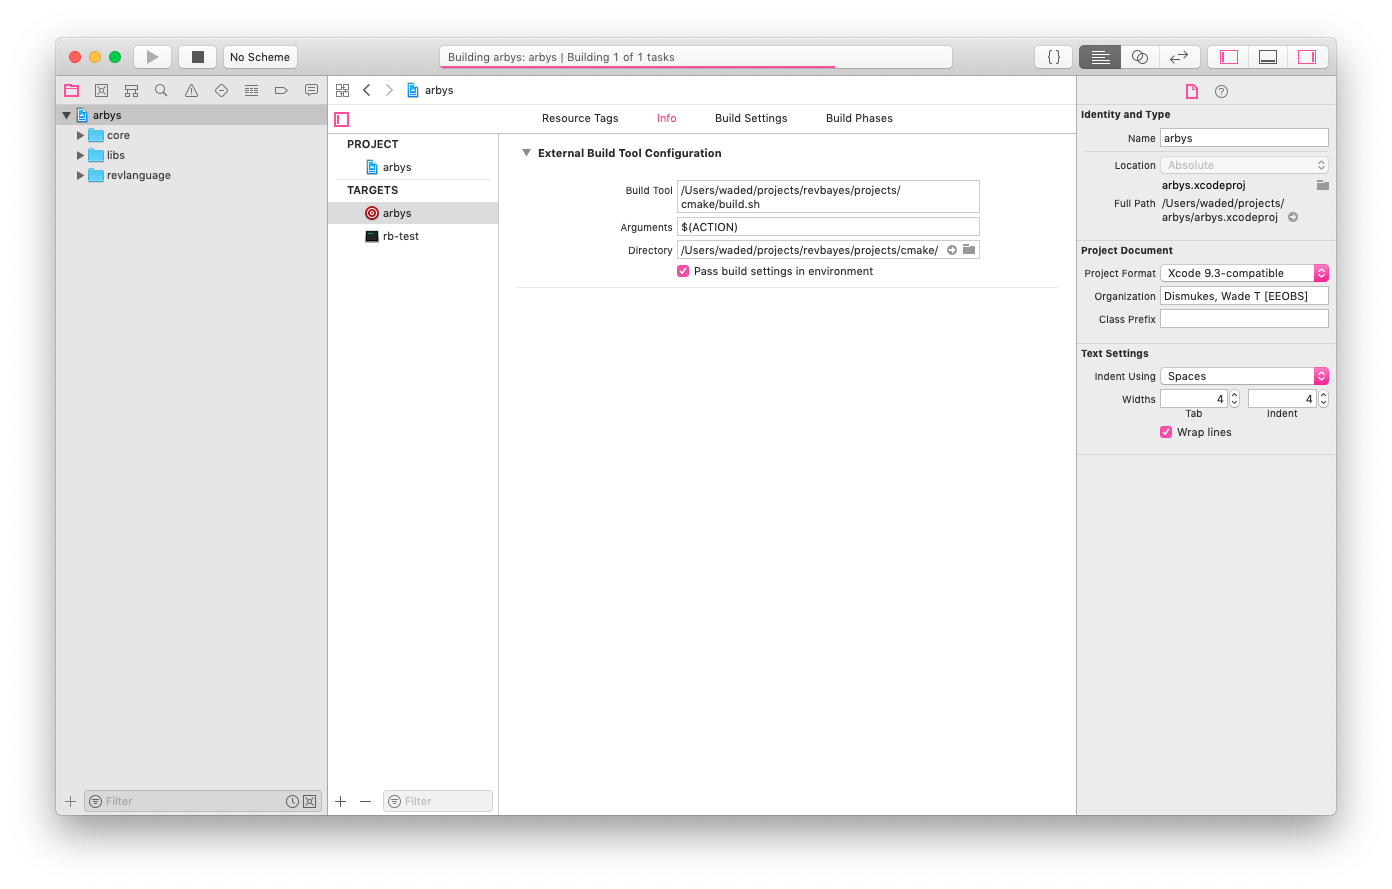
- On this screen, under Arguments type
$(ACTION) -boost true -debug true, or if you haven’t built the boost libraries in RevBayes already. If you have then type$(ACTION) -boost false -debug true. - Under Directory put
/<path-to-revbayes>/revbayes/projects/cmake/. - Add the source files by selecting the appropriate directory and going to the File pull-down menu and selecting **Add Files to
**. - This should open a screen that looks like this:
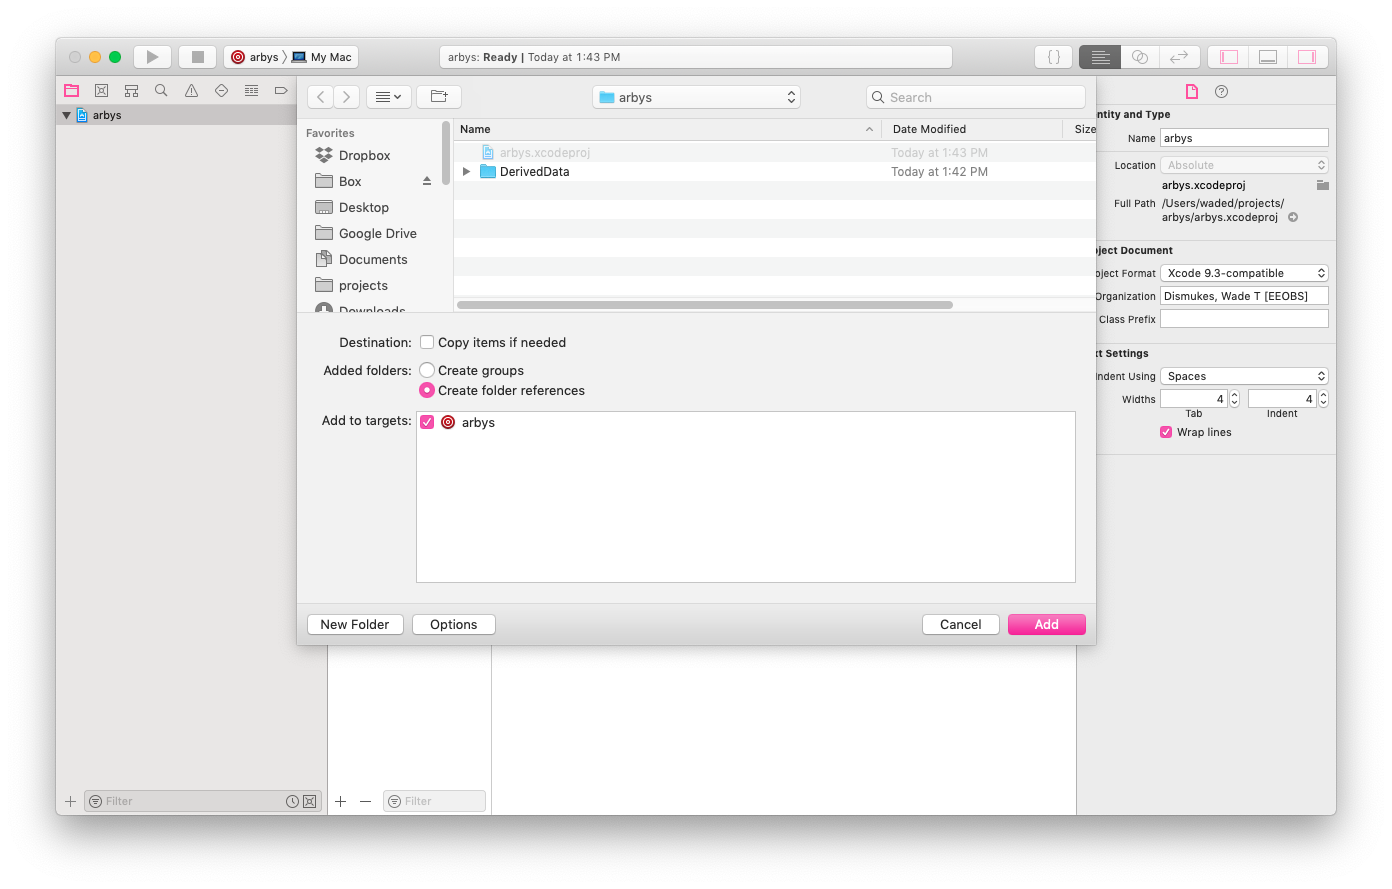
- Click on Options at the button of the window, and under the Added Folders heading, select Create as Folder References, and add to the target that was created in Step 2.
- Select the following directories from the
revbayesdirectory:revbayes/src/revlanguagerevbayes/src/corerevbayes/src/libs
- Click Add.
- Select the following directories from the
- At this point, if everything has been setup correctly, you should be able to build the project. You can try by clicking on Product - Build or by using ⌘+B.
- Once revbayes has built go to Product->Scheme->Edit Scheme, it should bring a window like this:
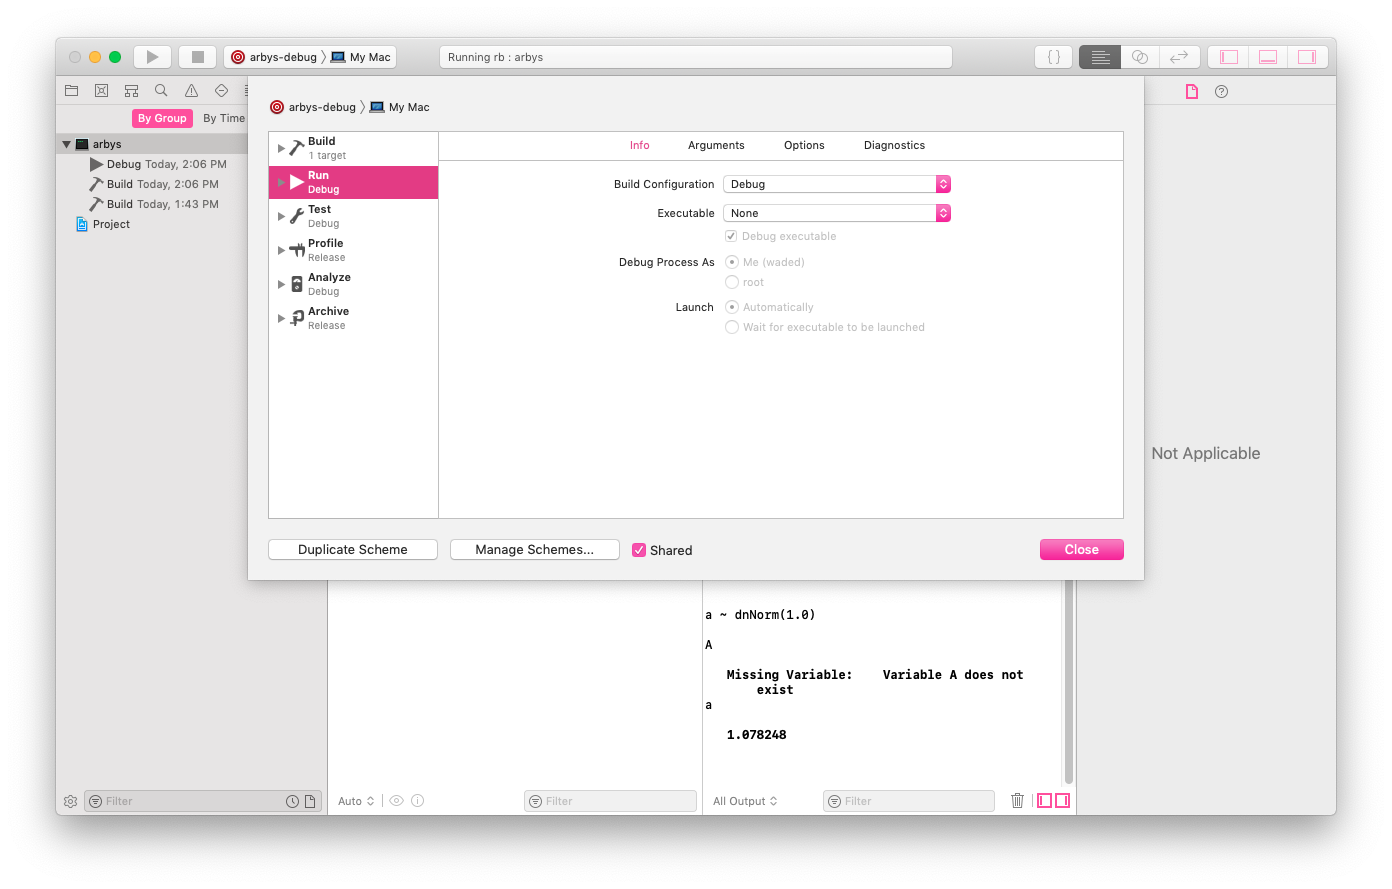
- Click on info, then go to executable and locate the newly built revbayes executable.
- Now you should be able to click the play button or ⌘+R, and you should see the revbayes command line prompt in the loading screen.
Setting up vim for RevBayes development (non-IDE)
Vim is a text editor that some people love. It’s not an IDE, but it can provide useful IDE-like behaviors. If you are reading this, you are probably a vim-lover and already have a set of customizations that you like. Here are some more to consider.
YouCompleteMe
YouCompleteMe is an extremely useful plugin that provides suggestions as you type for function names, prompts about their arguments, etc. There are several steps to get it working.
Install dependencies
This seems to be sufficient on Ubuntu 16.04:
sudo apt-get install build-essential cmake python-dev python3-dev clang
Get the vim code itself
Grab these two plugins:
Put them wherever you put your plugins, e.g., .vim/bundle/ if you’re using Pathogen.
For YCM, you also need to get its submodules:
cd YouCompleteMe/
git submodule update --init --recursive
(If you manage your plugins as git subtrees, note that you probably can’t for YouCompleteMe because it contains submodules itself.)
Compile the YCM plugin
YCM has a compiled component as well as vim code. This may take a few minutes to run.
cd YouCompleteMe/
./install.py --clang-completer
Provide the compilation flags to YCM
The above was to install YCM in general. To use it specifically with RevBayes (or any other project), you need to give it information about the codebase. YCM-Generator is one way to do this.
cd revbayes/  # or wherever you keep revbayes
cd projects/cmake/build/
~/.vim/bundle/YCM-Generator/config_gen.py . # adjust the vim path if necessary
That should take a few seconds to run. Then move the result to the top-level directory:
mv .ycm_extra_conf.py ../../../
Try it out
That should be it.
If YCM is working, when you open a revbayes .cpp or .h file, vim will ask Found revbayes/.ycm_extra_conf.py. Load?
If you find that you don’t want YCM operating on all your other filetypes, you can put something like this in your .vimrc.
let g:ycm_filetype_whitelist = { 'cpp': 1, 'c': 1, 'python': 1 }
Debugging with GDB
If you use vim, we recommend debugging in GDB. You’ll need to compile RevBayes with the -debug true flag:
./build.sh -debug true
The you can debug RevBayes with GDB:
gdb rb
See here for more on using GDB.
Setting up CLion for RevBayes development
Clion is a paid IDE from JetBrains. Your insititution may provide free access you can access here.
Prerequisites
You will first need to set up the build environment by compiling RevBayes on the command line.
For this tutorial I used CMake which I recommend for CLion but steps are likely similar for meson. Next, open Clion and open a project selecting the revbayes/src folder from wherever you have stored it on your computer.
CLion will likely not be able to build yet as it struggles to understand what you are using to build RevBayes that we will fix next. In the meantime close CLion and open your preffered terminal application, changing the directory to where you installed RevBayes.
Getting RevBayes working
Once here you will need to build using CMake once again in the revbayes directory this time using the following commands:
cmake -S src -B build-cmake -G Ninja -DCMAKE_BUILD_TYPE=Release
cmake --build build-cmake -j
The first command is doing a few different things but the most important is the -S src portion. This will tell CLion that revbayes/src is the actualy project root for the C++ project. CLion was expection the CMakeLists.txt to be in the revbayes directory even though its in the revbayes/src. The secone command is more of a organizational step that is creating a CMake build in the revbayes directory so it is explicitly seperate from a meson build.
Before we can fully utilize CLion, we need to remove a hidden file that was created when we opened our src project. First change your directory into the src directory and type the command ls -a. You should see the files contained in the directory including a directory called .idea. Many IDEs create ‘hidden’ files that stores configuration information about the project. The next command can be dangerous so please be careful in its use.
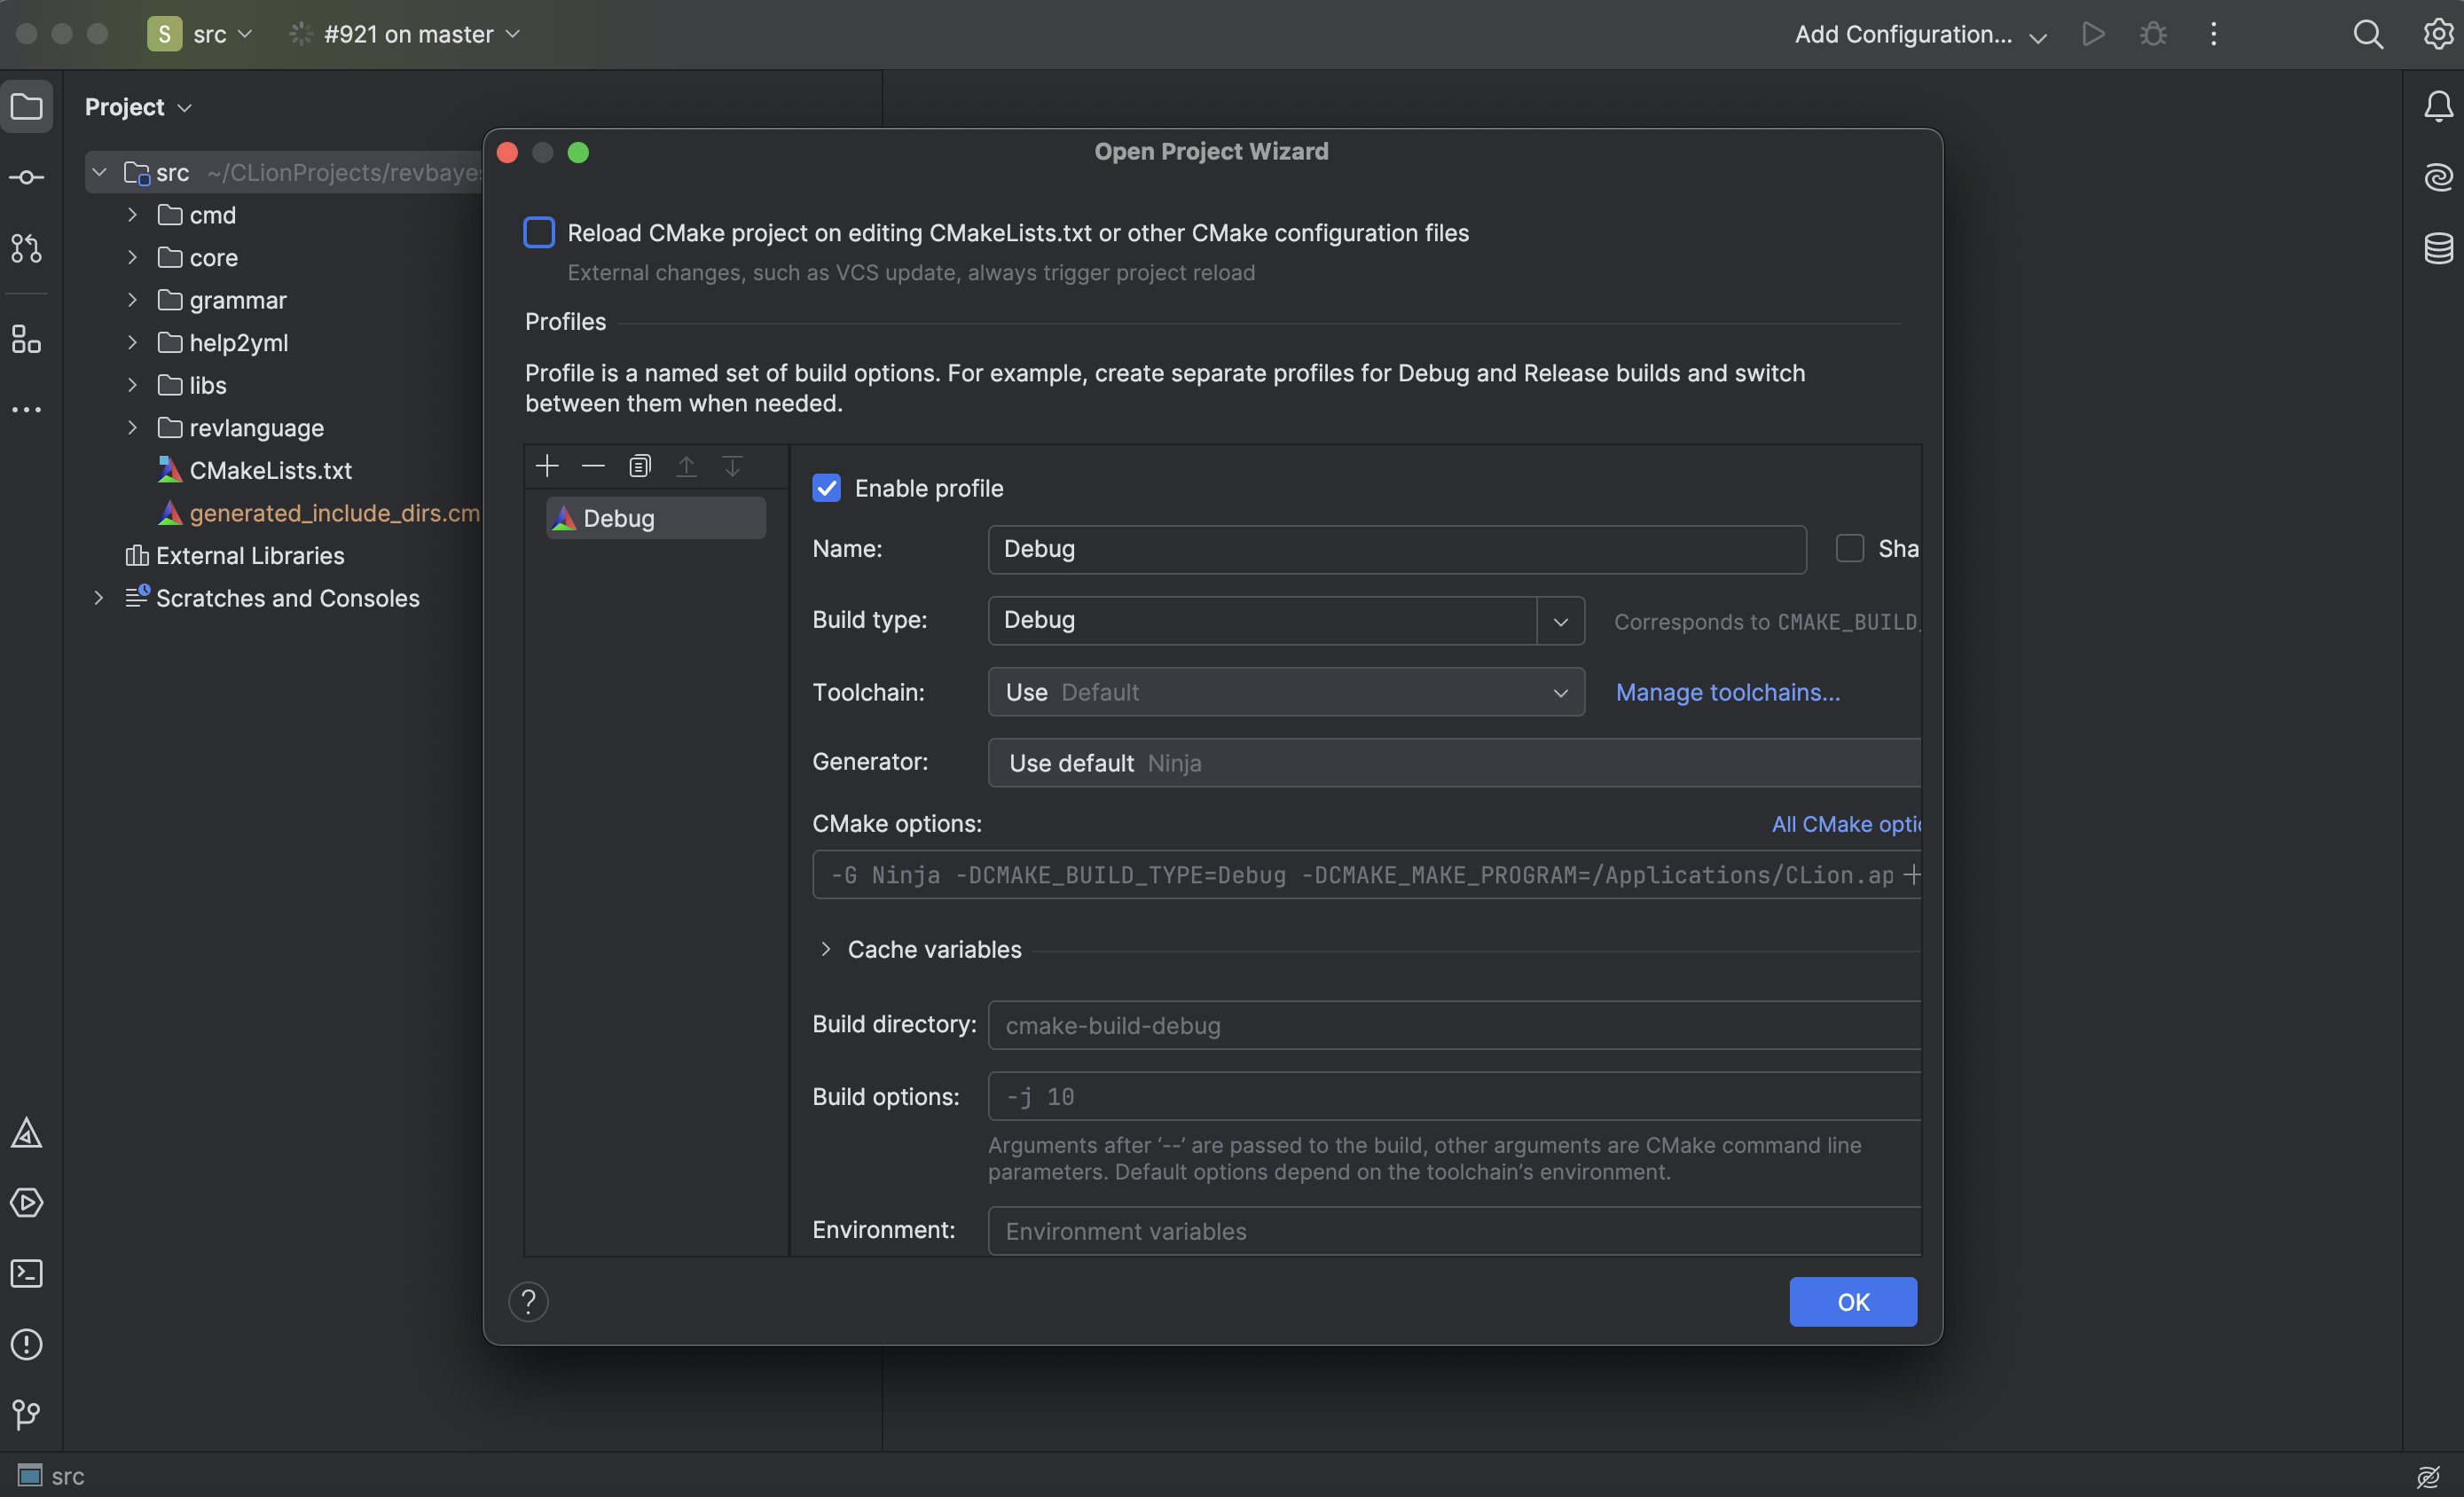
In your src directory type the command rm -rf .idea to remove this config information as we will want a ‘clean slate’ when we open the project. Now you are ready to launch CLion again! Launch the program and open the project using the revbayes/src directory. You should see the following pop-up just click ok!
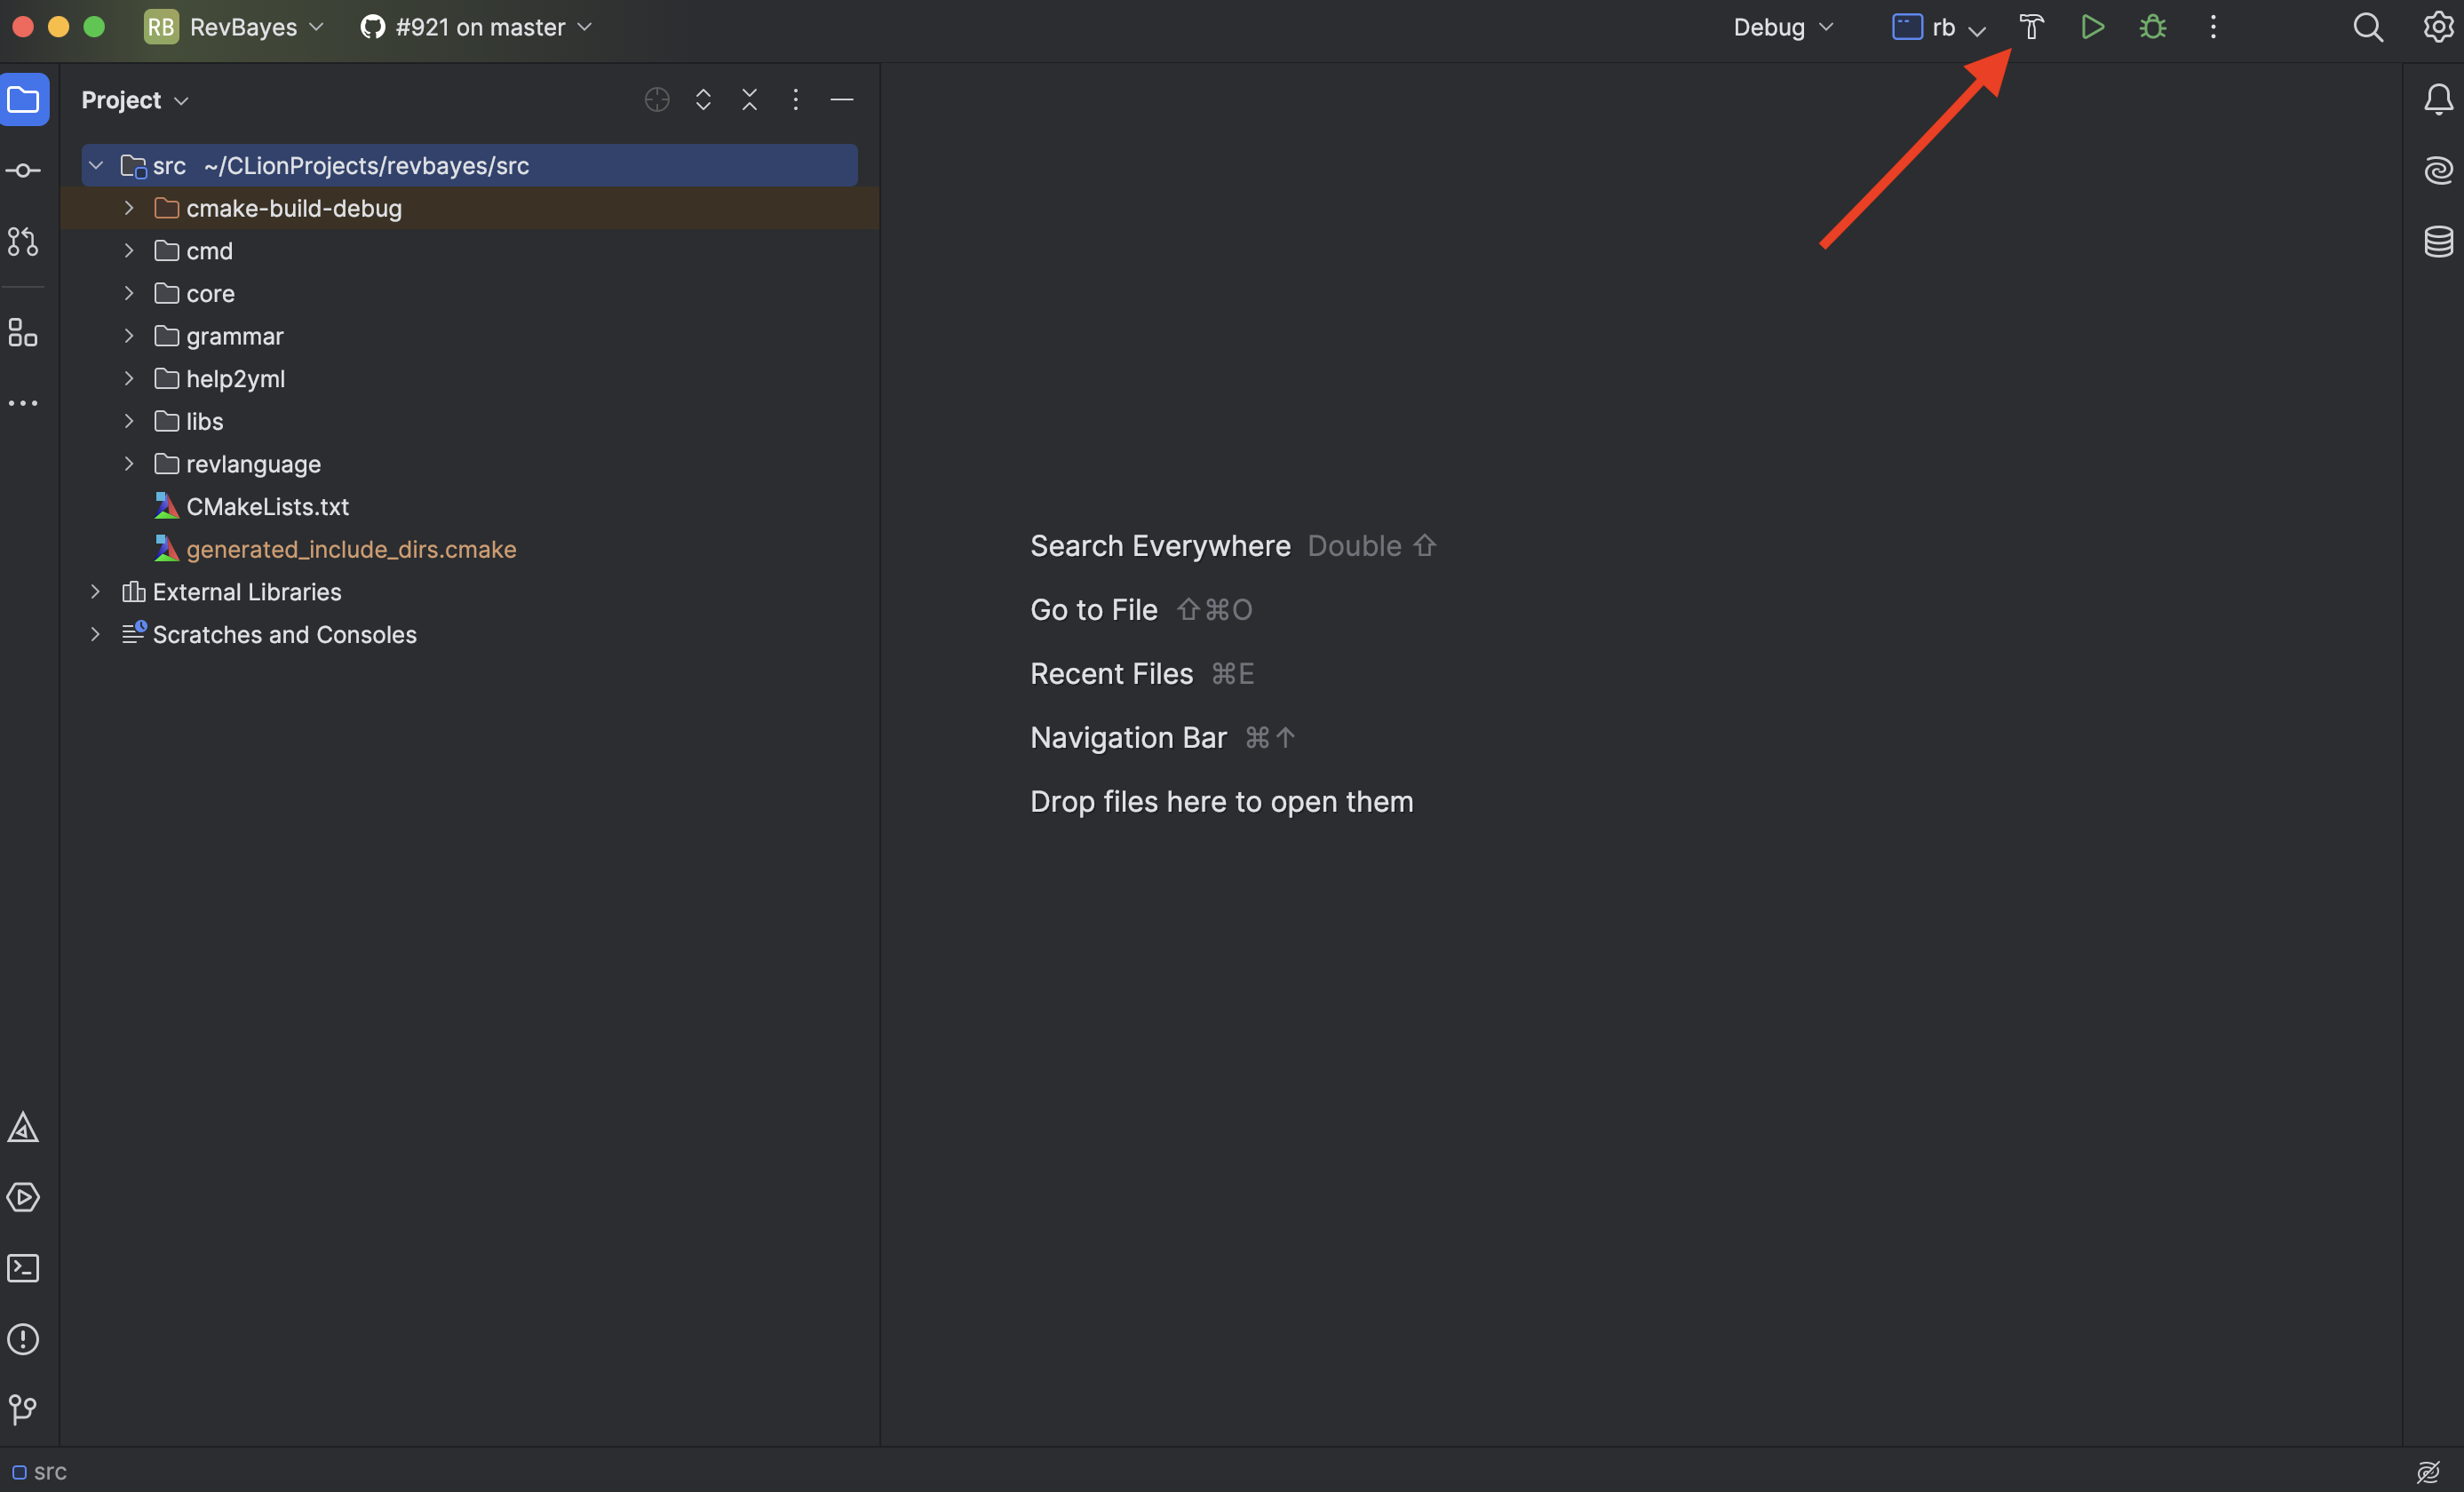
Finally we can build IN CLion! Click the build button shown here. You can also launch in debug mode but if everything has gone smoothly your now ready to start developing!
Setting up Qt Creator for RevBayes development
Qt Creator is a free IDE from Qt Group.
Prerequisites
You will first need to set up the build environment by compiling RevBayes on the command line.
For this tutorial I used Meson which I recommend for Qt Creator.
To install Qt Creator using homebrew, type the following into your local terminal: brew install --cask qt-creator.
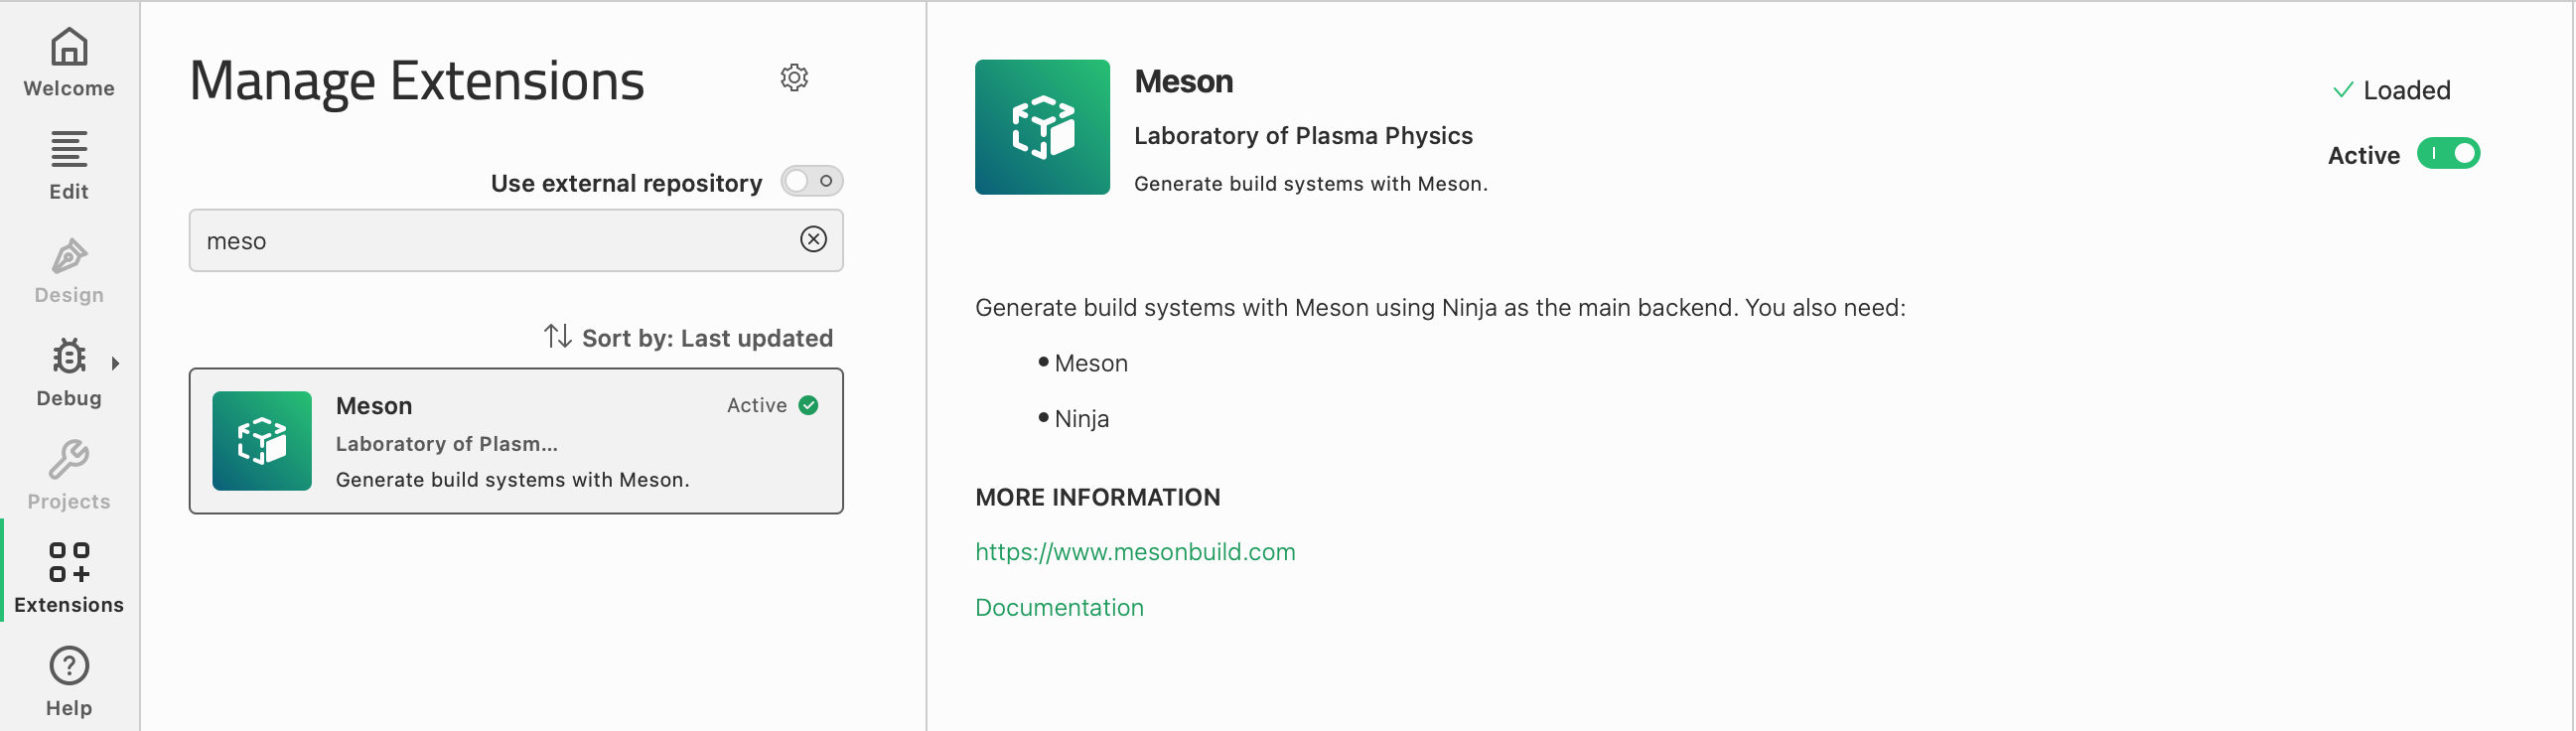
Once installed, open Qt Creator (found in Applications) and navigate to the Extensions menu. Once there, you will need to activate the Meson extension.
Now, make your way back to the Welcome menu. Once there, click Open Project and navigate to where your revbayes repository was stored. Select meson.build and Open.

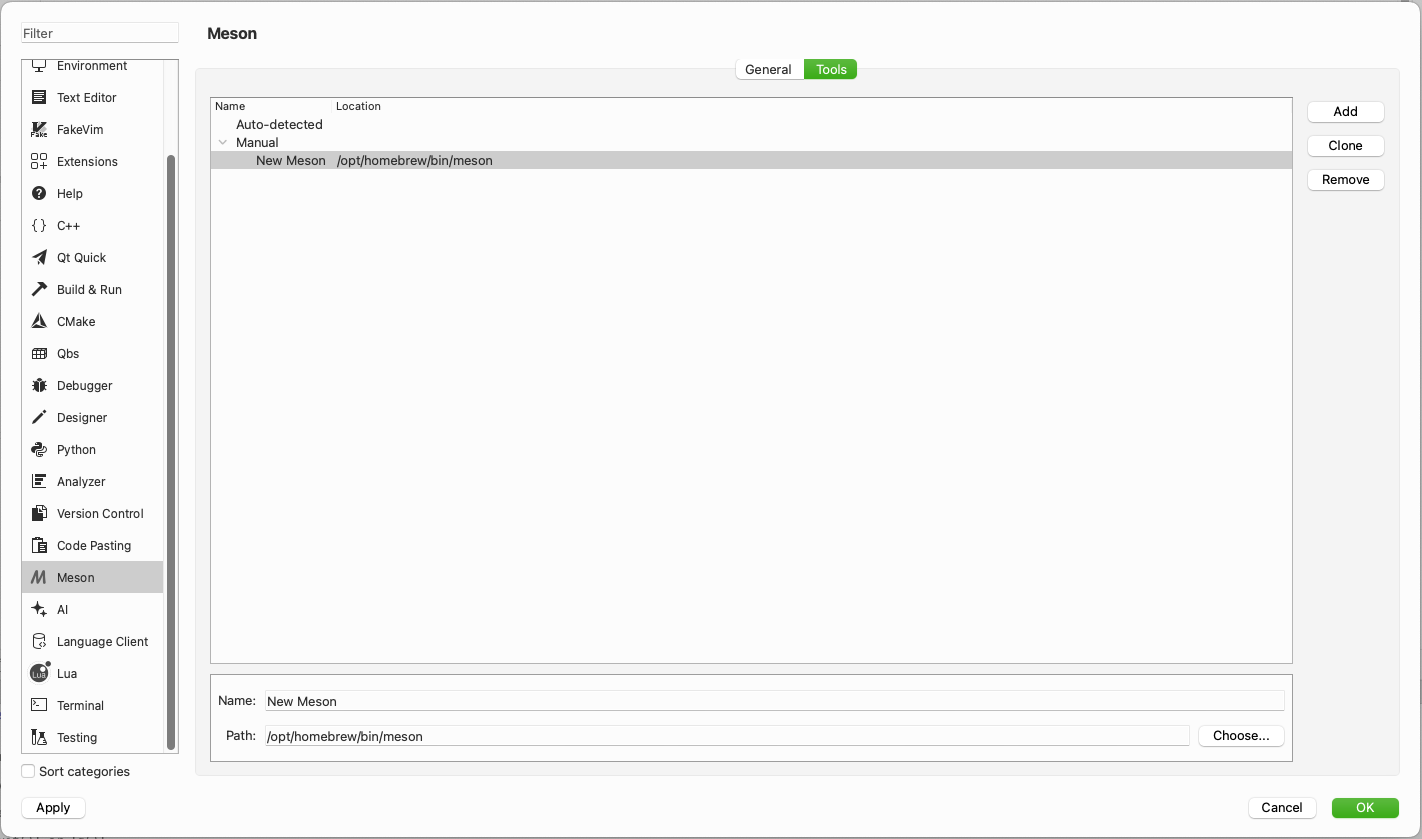
Next, navigate to the Projects menu and click Manage Kits…
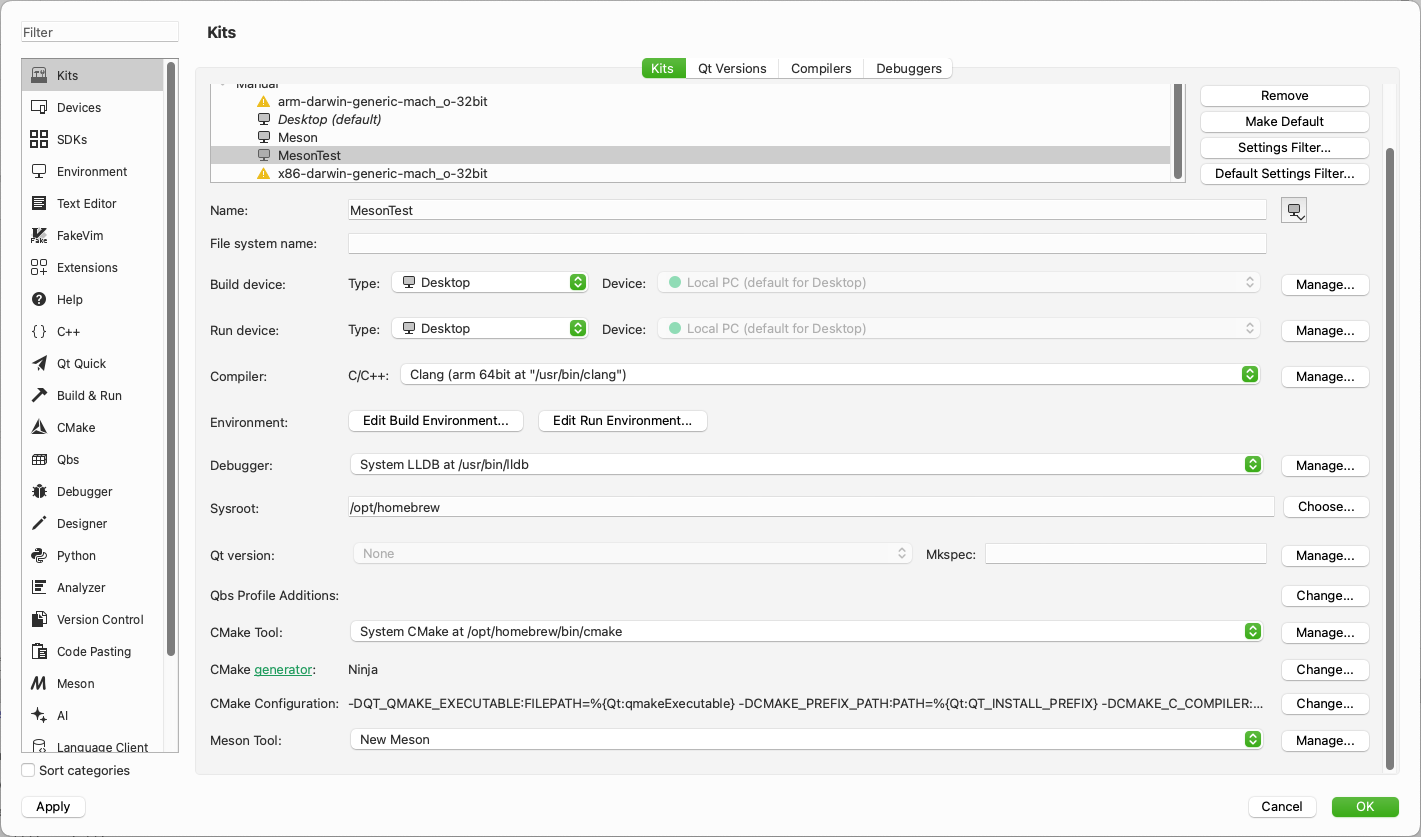
Navigate to the Meson menu. Once there, you should see the path to your installed meson. If it is not there, manually add it as pictured below.
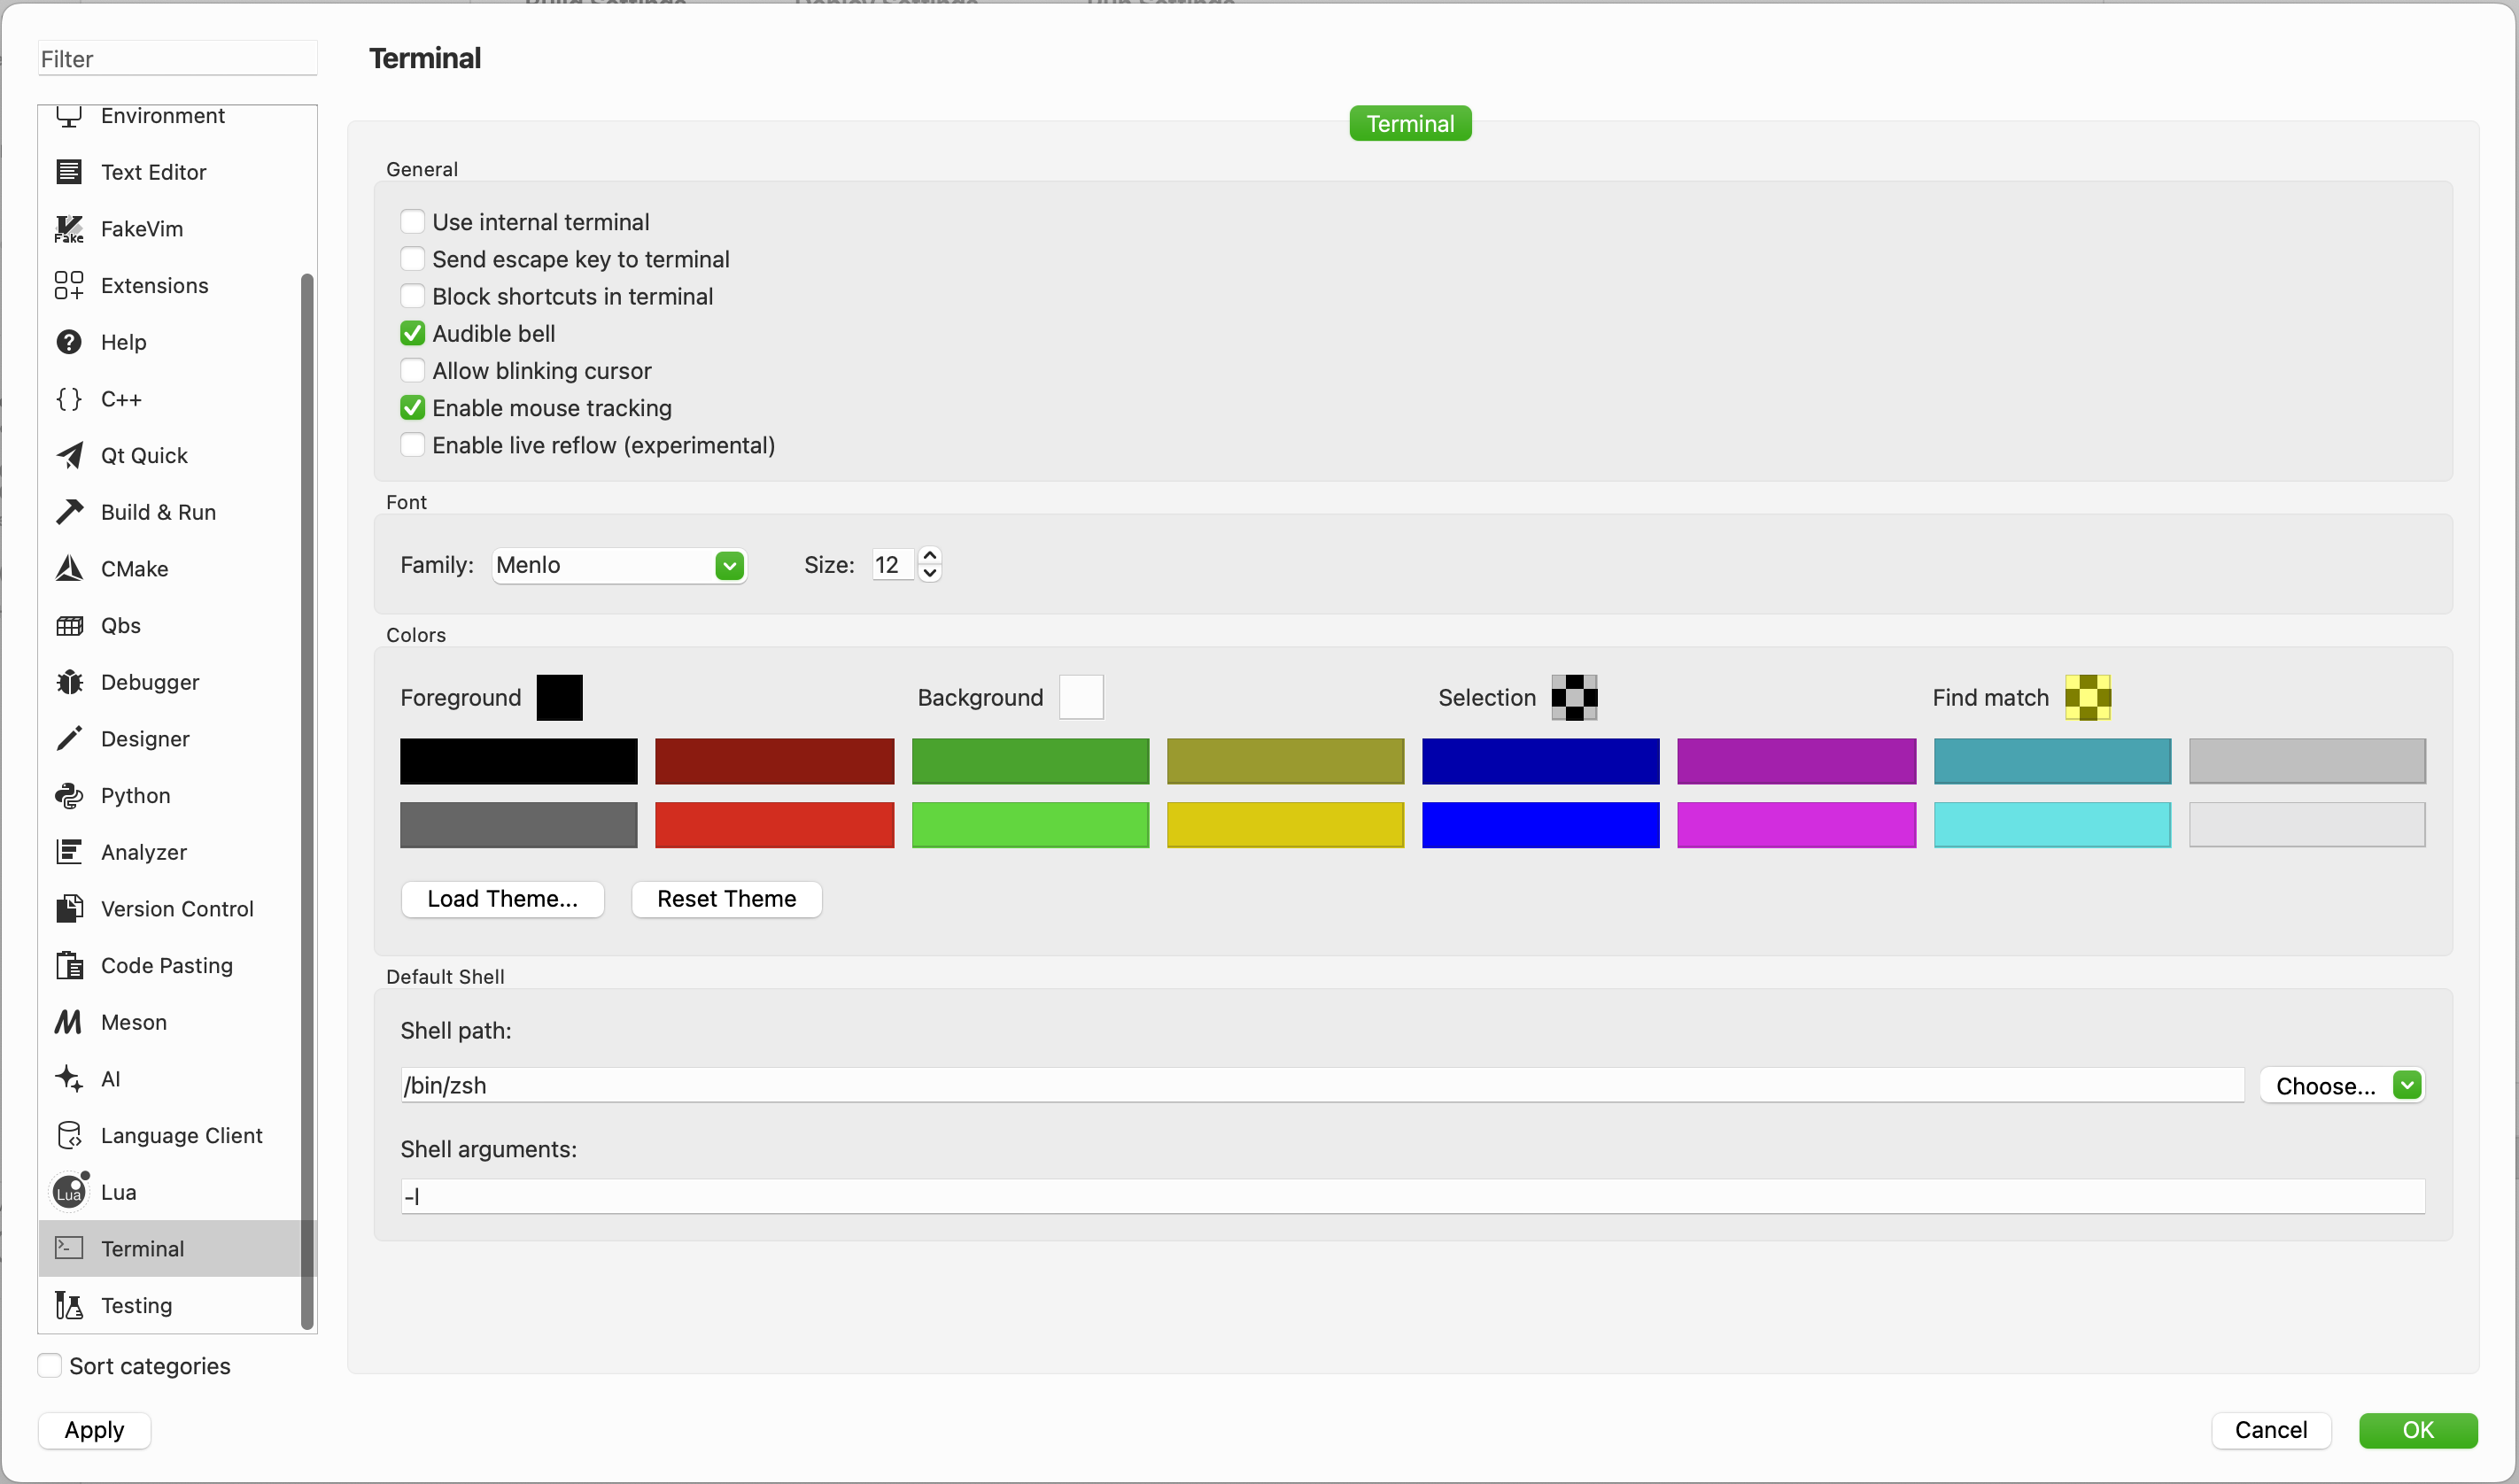
Then, make our way to the Terminal menu and deselect Use internal terminal.
QT Creator will likely not be able to build yet as it struggles to understand where to find your boost. In this event, you will need to manually add the BOOST_ROOT path to the Build Environment, as pictured below.

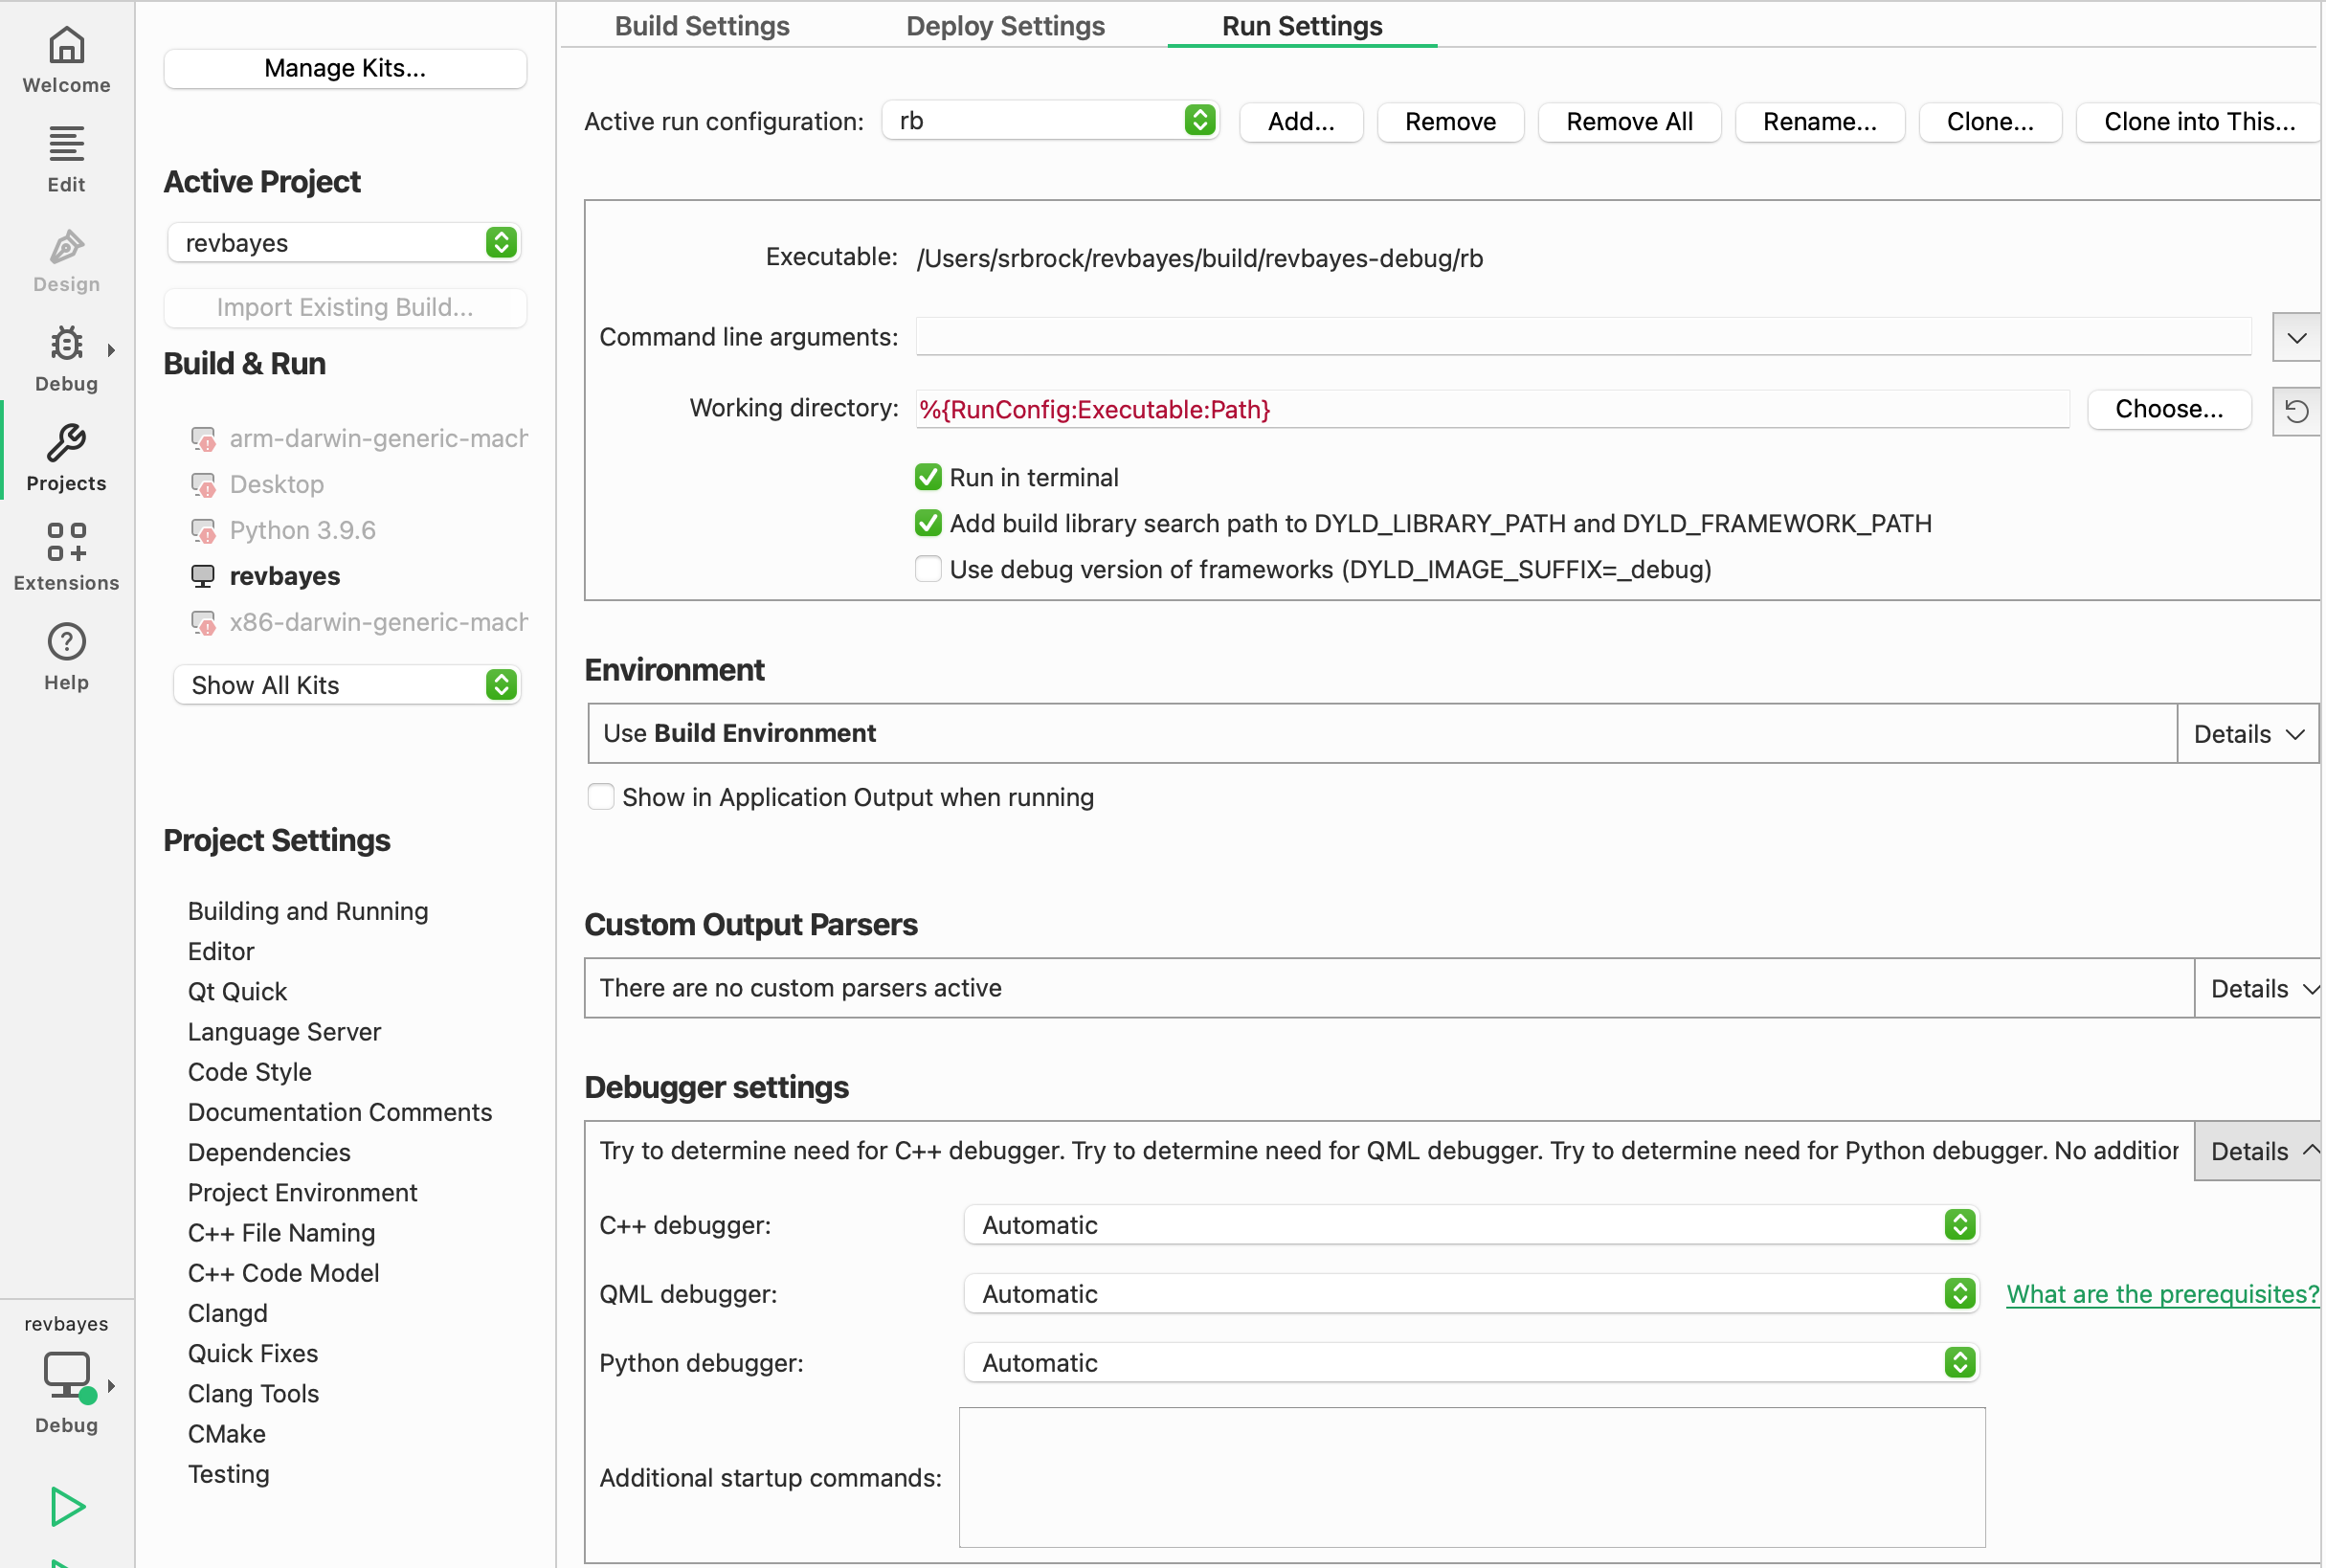
Now, navigate to the Projects menu. Once there, select Run Settings. Click Run in terminal.
You are finally ready to build RevBayes! Navigate to the Edit menu. Once there, click the green triangle with the bug to run.