Overview
This tutorial covers how to set up files and directories to work effectively in RevBayes (Höhna et al. 2014; Höhna et al. 2016). This workshop assumes no familiarity with the command line, or programming in general. The themes of good directory structuring shown in this tutorial will be used in many other RevBayes tutorials.
Using your computer’s graphical user interface
Downloading and storing data and scripts
Many of the RevBayes tutorials will as you to download data and/or scripts.
Let us begin by downloading the data and scripts associated with this tutorial.
For each tutorial that you do, you should create a directory, sometimes called a folder, somewhere logical on your computer.
Since we are doing the tutorial_structure tutorial, please title your directory tutorial_structure.
In this new directory, create two more directories, one called data and one called scripts.
You will note a box called Data files and scripts in the upper left-hand corner of this webpage.
Please download the files listed in this directory.
Drag and drop example_file.nex into your data directory.
Then, move test.Rev into your scripts directory.
Having a directory of data that contains all your data for a project, and a directory of scripts is a good practice.
This allows you to stay organized and avoid misplacing crucial scripts in your data analysis pipeline.
Spaces In Filenames
Most scientific programming languages and software does not deal well with spaces in file names. If you will be doing much scientific computing, it will be best to get in the habit of not using spaces in file and folder names.
Preparing to Run RevBayes
In this section of the tutorial, we will focus on running RevBayes from your computer’s graphical interface.
First, note down the location of your tutorial directory.
For example, mine is in my computer’s user home, in a directory called Tutorials.
A graphic of this is shown in Fig. 1.
Computers do not understand the visual representation of the directory structure. Instead, we will translate this information into text.
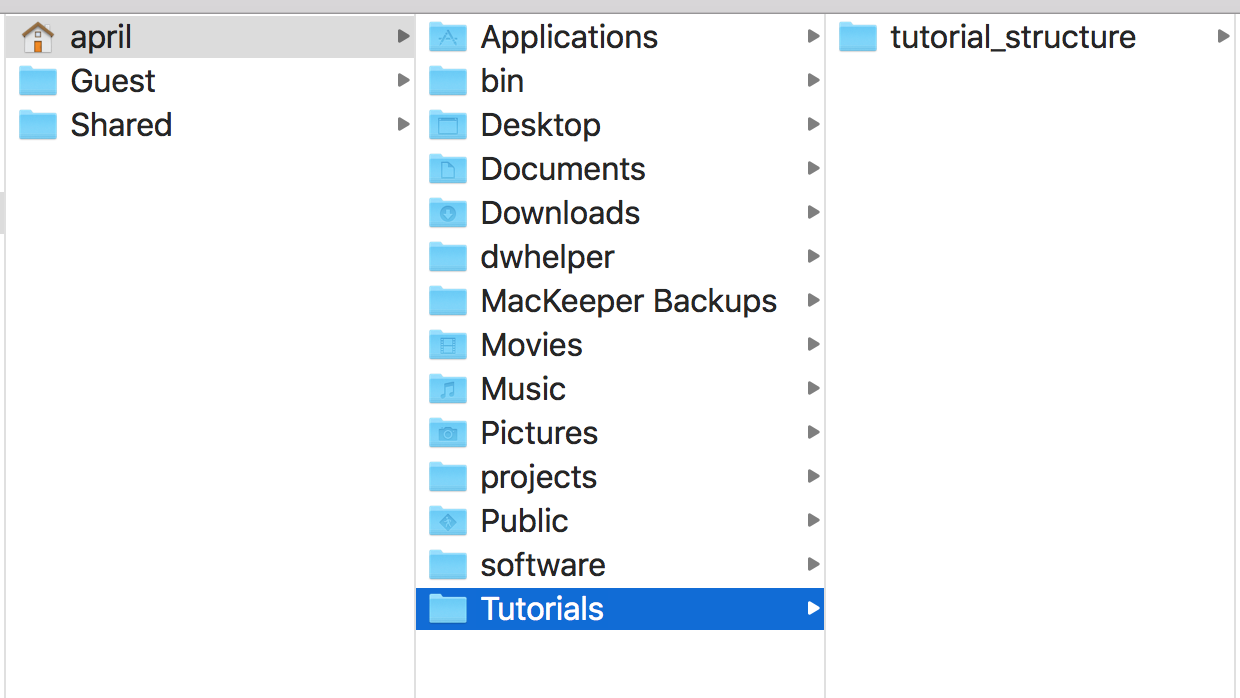
Tutorials with a subdirectory for this specific tutorial.macOS
The home directory on a computer on a Mac is labeled with a ~/.
Each contained directory is separated by a / character.
The above directory structure would be written out like so:
~/tutorials/tutorial_structure/
Note down where you have your tutorial stored.
Next, we will launch RevBayes.
Do this by double-clicking on rb.
We will now set your working directory.
This ensures that RevBayes is aware of where in your computer your code and data are stored.
By default, RevBayes assumes you are in your user home on your computer.
Therefore, we can leave off the ~/, as RevBayes will assume its presence.
In RevBayes, use the setwd() command in conjunction with your path to your tutorial to set your working directory.
For example, my command will look like so:
setwd("Tutorials/tutorial_structure/")
Finally, test your working directory like so:
source("scripts/test.Rev")
If everything has succeeded, you will see the following output:
   Processing file "scripts/test.Rev"
   Hi there! Welcome to RevBayes! I am now going to read in some test data.
   Successfully read one character matrix from file 'data/example_file.nex'
   Congratulations, you set up your scripts and code directories correctly.
   Processing of file "scripts/test.Rev" completed
At this point, you can quit RevBayes by typing the q() command, and close the window opened by the program.
If something goes wrong
If you were not able to successfully execute the script, the most common culprit is that RevBayes is not executing from where you think. Try running
getwd()and making sure that your starting working directory is what you think it is.
Windows
The home directory on a computer on a Windows is labeled as c:.
Each contained directory is separated by a \\ character.
The above directory structure would be written out like so:
"c:\\april\\tutorials\\tutorial_structure"
Note down where you have your tutorial stored.
Next, we will launch RevBayes.
Do this by double-clicking on rb.
We will now set your working directory.
This ensures that RevBayes is aware of where in your computer your code and data are stored.
In RevBayes, use the setwd() command in conjunction with your path to your tutorial to set your working directory.
For example, my command will look like so:
setwd("c:\\april\\tutorials\\tutorial_structure")
Finally, test your working directory like so:
source("scripts/test.Rev")
If everything has suceeded, you will see the following output:
   Processing file "scripts/test.Rev"
   Hi there! Welcome to RevBayes! I am now going to read in some test data.
   Successfully read one character matrix from file 'data/example_file.nex'
   Congratulations, you set up your scripts and code directories correctly.
   Processing of file "scripts/test.Rev" completed
At this point, you can quit RevBayes by typing the q() command. This will automatically close the window opened by the program.
Linux
Linux users must access RevBayes via the command line interface.
Using your computer’s terminal interface
Many RevBayes users may want to use RevBayes from the command-line interface. This technology allows users to interact directly with the computer’s file system. It is the predominant way many remote servers and supercomputers are used.
Command Line on Windows
Linux and macOS users have a command line interface by default on their machines. Windows users will have to install one. A common command line interface is Git For Windows.
Downloading and storing data and scripts
Many of the RevBayes tutorials will as you to download data and/or scripts.
Let us begin by downloading the data and scripts associated with this tutorial.
For each tutorial that you do, you should create a directory, sometimes called a folder, somewhere logical on your computer.
Since we are doing the tutorial_structure tutorial, please title your directory tutorial_structure.
In this new directory, create two more directories, one called data and one called scripts.
Spaces in filenames
Most scientific programming languages and software do not deal well with spaces in file names. If you will be doing much scientific computing, it will be best to get in the habit of not using spaces in file and folder names.
You will note a box called Data files and scripts in the upper left-hand corner of this webapge.
Please download the files listed in this directory.
Drag and drop example_file.nex into your data directory.
Then, move test.Rev into your scripts directory.
Having a directory of data that contains all your data for a project, and a directory of scripts is a good practice. This allows you to stay organized and avoid misplacing crucial scripts in your data analysis pipeline.
Preparing to Run RevBayes
In this section of the tutorial, we will focus on running RevBayes from your computer’s graphical interface.
First, note down the location of your tutorial directory.
For example, mine is in my laptop’s shared drive, in a directory called tutorials.
This can be seen in
Computers do not understand the visual representation of the directory structure. Instead, we will translate this information into text.
tutorials with a subdirectory for this specific tutorial.macOS and Linux
The home directory on a computer on in a terminal is labeled with a ~/.
Each contained directory is separated by a / character.
The above directory structure would be written out like so:
~/Tutorials/tutorial_structure/
Open your terminal application. Change directories to the tutorial directory with the terminal’s cd command. For example, my command will be:
cd ~/Tutorials/tutorial_structure/
Next, we will launch RevBayes. First, note where RevBayes is stored on your computer.
For example, my copy of RevBayes is stored in a software directory in my user home.
Therefore, to launch my RevBayes, I will type:
~/software/rb
Finally, test your working directory like so:
source("scripts/test.Rev")
If everything has succeeded, you will see the following output:
   Processing file "scripts/test.Rev"
   Hi there! Welcome to RevBayes! I am now going to read in some test data.
   Successfully read one character matrix from file 'data/example_file.nex'
   Congratulations, you set up your scripts and code directories correctly.
   Processing of file "scripts/test.Rev" completed
At this point, you can quit RevBayes by typing the q() command.
The System Path
The
System Pathtells your computer default locations to look for pieces of software. If a piece of software is added to the path, it can be found and launched from anywhere on the computer. This is beyond the scope of this tutorial, but information is readily available on doing this from other sources. If RevBayes is in your path, it can be executed by simply typingrbon Windows or./rbon Mac or Linux.
Windows
We will first launch RevBayes.
Open your terminal application.
See the aside Command Line on Windows for more information on this point.
Note where RevBayes is stored on your computer.
For example, my copy of RevBayes is stored in a software directory in my user home.
Therefore, to launch my RevBayes, I will type:
~/software/rb
Next, we will set our working directory.
Windows will not pick up file paths from the environment in the same way Mac and Linux will.
Therefore, we will need to write out our directories, separated by \\ characters.
My tutorial directory, as shown in Figure 1, will be written out as:
setwd("c:\\april\\tutorials\\tutorial_structure")
Finally, test your working directory like so:
source("scripts/test.Rev")
If everything has succeeded, you will see the following output:
   Processing file "scripts/test.Rev"
   Hi there! Welcome to RevBayes! I am now going to read in some test data.
   Successfully read one character matrix from file 'data/example_file.nex'
   Congratulations, you set up your scripts and code directories correctly.
   Processing of file "scripts/test.Rev" completed
At this point, you can quit RevBayes by typing the q() command.
Using RevBayes with R and RStudio
R is a fairly common computing language in biology. RevBayes users may want to use RevBayes through RStudio (RStudio Team 2025), a popular graphical interface for R. In this section of the tutorial, we will focus on running RevBayes from RStudio. Once you’ve followed the RStudio instructions on the interfaces page, you can run use Rev language as you would in a standard RMarkdown document.
Installation
To do so, we will first need to install the Revticulate package. Revticulate can be installed in two ways.
Both will assume a working installation of R and (optionally) RStudio.
The first is via CRAN, using the default install.packages function in R:
install.packages("Revticulate")
The second is via the remotes package, a lightweight package enabling installation from GitHub repositories.
remotes::install_github("revbayes/Revticulate")
The GitHub repository for Revticulate contains cutting-edge features and may contain bugfixes, but the CRAN is known to be stable for everyday use.
To begin using your Revticulate package in R, in an RMarkdown chunk, type:
 library(Revticulate)
 knitRev()
When you execute this chunk, Revticulate will run a package check.
This check searches for an .Renviron file that contains a RevBayes path. If the package doesn’t find this file, or finds it without the path, the package prompts the user to use usethis::edit_r_environ(). This opens the .Renviron file, and the user will enter rb=/absolute/path/to/revbayes. This can be edited at any time if there are multiple installs on the system, or if you recompile RevBayes and want to use a new version.
First, we will test that RevBayes is accessible to us. RevBayes can be used in a KnitR chunk by changing the header to rb instead of r. If you are unsure how to edit a chunk to have the proper type, the test.Rmd file in this tutorial provides examples. In the below chunk, we create an object called example and use the assignment operator to give it the value 1. Then we print it. This will fail if RevBayes cannot be found. If this is the case, check that the path in your .Renviron goes to RevBayes, and restart.
```{rb}
variable <- "Hi there! Welcome to RevBayes! I am now going to read in some test data."
variable
```
Next, we will attempt to read in some data. Use the setwd() command to ensure that you are in the directory for this tutorial.
```{rb}
molecular_data <- readDiscreteCharacterData("data/example_file.nex")
```
If you get an error such as rb not found, make sure you executed this block:
```{r}
library(Revticulate)
knitRev()
```
Using Jupyter
Jupyter is a popular interface for programming in python, though it implements numerous other languages. Once you have completed the instructions on the interfaces page, you will be able to choose RevBayes as a possible language. An example of this is below.

Once the language is set to Rev, all cells in the notebook will execute using RevBayes. Example notebooks can be found in the notebooks repository.
- Höhna S., Landis M.J., Heath T.A., Boussau B., Lartillot N., Moore B.R., Huelsenbeck J.P., Ronquist F. 2016. RevBayes: Bayesian Phylogenetic Inference Using Graphical Models and an Interactive Model-Specification Language. Systematic Biology. 65:726–736. 10.1093/sysbio/syw021
- Höhna S., Heath T.A., Boussau B., Landis M.J., Ronquist F., Huelsenbeck J.P. 2014. Probabilistic Graphical Model Representation in Phylogenetics. Systematic Biology. 63:753–771. 10.1093/sysbio/syu039
- RStudio Team. 2025. RStudio: integrated development environment for R. Boston, MA: Posit Software, PBC. https://www.rstudio.com/